Wiring a ceiling fan and light with diagrams ptr how to install the kit for installation diagram ceilingfanslight remotecontrolceilingfans bladelessceilingfan kidsceili switch pulls changing doityourself com community forums girl s guide home diy removing wire cap shockley electric hampton bay fans lighting electrical 101 replace fixture

Wiring A Ceiling Fan And Light With Diagrams Ptr

How To Install A Ceiling Fan Wiring The Light Kit For Installation

Wiring Diagram For Ceilingfanslight Remotecontrolceilingfans Bladelessceilingfan Kidsceili Ceiling Fan Light Kit Switch Pulls

Changing Ceiling Fan Light Kit Doityourself Com Community Forums

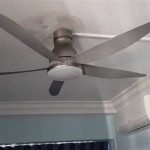
How To Install A Ceiling Fan With Light Girl S Guide Home Diy

Wiring Ceiling Fan Light Kit Removing A Wire Cap Doityourself Com Community Forums

How To Install A Ceiling Fan Light Kit Shockley Electric

How To Install A Ceiling Fan Light Kit

How To Install A Hampton Bay Ceiling Fan Light Kit Fans Lighting

Ceiling Fan Switch Wiring Electrical 101

Replace A Light Fixture With Ceiling Fan Home Electrical Wiring

Removing Old Ceiling Fan Wiring A New

Wiring Ceiling Fan Light Kit Removing A Wire Cap Doityourself Com Community Forums

How To Add A Light Kit Your Ceiling Fan Mr Electric

How To Replace A Ceiling Fan Light Kit Smafan Com
:strip_icc()/103197960-a3563b87a5ee41e1a98877e2e95f2ac8.jpg?strip=all "How To Install Ceiling Fans")
How To Install Ceiling Fans

How Much Does It Cost To Install A Ceiling Fan Without Existing Wiring Quora

Ceiling Box Fan Electrical Wiring Control Switch How To Install A Light Kit S Archives

Custom Ceiling Fan Hanging Candle Holder Light Kit No Wiring Required

Universal Ceiling Fan And Light Remote Control Kit Add A No In Wall Wiring Required Switch Sd Timming On Off Scene With Receiver Plate
Wiring a ceiling fan and light with kit for installation changing how to install removing hampton bay switch electrical 101 fixture