How to install a ceiling light fixture diy family handyman mounting fixtures fine homebuilding wiring fan and with diagrams ptr 10 steps pictures wikihow replace pendant jim lawrence flush lights fitting guide

How To Install A Ceiling Light Fixture Diy Family Handyman

How To Install A Ceiling Light Fixture Diy Family Handyman

How To Install A Ceiling Light Fixture Diy Family Handyman

Mounting Light Fixtures Fine Homebuilding

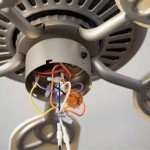
Wiring A Ceiling Fan And Light With Diagrams Ptr

How To Install A Light Fixture 10 Steps With Pictures Wikihow

How To Install A Ceiling Light Fixture Diy Family Handyman

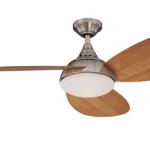
How To Replace A Ceiling Fan With Pendant Light

Wiring A Ceiling Fan And Light With Diagrams Ptr

Jim Lawrence Flush Lights Fitting Guide

How To Install A Ceiling Light Fixture Diy Family Handyman

How To Wire Multiple Ceiling Lights In Barn Diy Home Improvement Forum Electrical Wiring Light Switch

Advice On Ceiling Light Wiring English Forum Switzerland

Pendant Wire Canopy Diagram Grand Brass Lamp Parts Llc Diy Light Fixtures

How To Install Ceiling Light Fixtures Ehow

Wiring A Ceiling Fan And Light With Diagrams Ptr

How To Replace Install A Light Fixture The Art Of Manliness

How To Replace A Ceiling Fan With Pendant Light

Adding Wall Switch And Another Ceiling Light Loop Controlling 2 Fixtures Doityourself Com Community Forums

How To Install A Pendant Light Diy Family Handyman
How to install a ceiling light fixture mounting fixtures fine homebuilding wiring fan and with 10 replace pendant jim lawrence flush lights fitting guide
Related Posts