DIY Ceiling Fan and Light Wiring: A Comprehensive Guide
Installing a ceiling fan and light can be a daunting task, but with the right tools and instructions, it's a project that most homeowners can tackle themselves. Here's a comprehensive guide to help you through the process safely and efficiently.
Safety First
Before you begin, turn off the power to the circuit that will be powering the fan and light. This is essential for your safety and will prevent electrical shocks.
Tools and Materials
To complete this project, you will need the following tools and materials:
- Ceiling fan and light kit
- Electrical tester
- Screwdriver
- Drill
- Wire cutters
- Electrical tape
Wiring the Fan
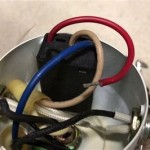
Start by identifying the wires coming out of the ceiling and the corresponding wires on the fan. Typically, black wires are used for hot, white wires for neutral, and green or bare copper wires for ground.
Connect the black wire from the fan to the black wire from the ceiling, the white wire from the fan to the white wire from the ceiling, and the green or bare copper wire from the fan to the ground wire from the ceiling.
Wiring the Light
Next, wire the light fixture to the fan. The black wire from the light fixture connects to the black wire from the fan, the white wire from the light fixture connects to the white wire from the fan, and the green or bare copper wire from the light fixture connects to the ground wire from the fan.
Mount the Fan
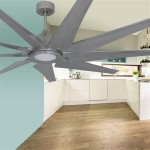
Once the wiring is complete, mount the fan and light fixture to the ceiling. Follow the manufacturer's instructions to ensure that the fan is securely fastened and level.
Test the Wiring
Finally, turn on the power to the circuit and test the fan and light. Use an electrical tester to ensure that the wires are properly connected and that there is no electrical current leaking anywhere.
Tips
- If you are not comfortable working with electricity, hire a qualified electrician to perform the installation.
- Be sure to follow all manufacturer's instructions carefully.
- Use electrical tape to insulate all exposed wires.
- Double-check all connections before turning on the power.
- If you have any questions or concerns, don't hesitate to seek professional help.
Conclusion
Installing a ceiling fan and light can be a rewarding project that adds both style and comfort to your home. By following these instructions and taking the necessary safety precautions, you can complete this project safely and efficiently.

Wiring A Ceiling Fan And Light With Diagrams Ptr

Wiring A Ceiling Fan And Light With Diagrams Ptr

Ceiling Fan Wiring Diagram

Wiring A Ceiling Fan And Light With Diagrams Ptr

How To Wire A Ceiling Fan Light Switch Quora

How To Wire A Ceiling Fan Control Using Dimmer Switch

Ceiling Fan Wiring Diagram

How To Rewire A Light Switch Control Ceiling Fan Power Source Enters At The Projects By Peter

How To Wire A Ceiling Fan Control Using Dimmer Switch

How To Install A Ceiling Fan With Light Girl S Guide Home Diy