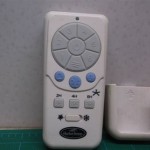
Troubleshooting your remote controls step by ceiling fans lighting successful hampton bay fan installation projects stories smartthings community control removal riley 44 in indoor led brushed nickel with light kit 5 quickinstall reversible blades and 52144 the home depot mena 54 white color changing outdoor hugger matte 92402 universal replacement for harbor breeze hunter litex 3 sd dimmer receiver fan28r replace 53t 2aazpfan 11t kujce9103 uc7030t com uc7078t converting operated to 2 wall switches doityourself forums fc120 carl 48 inch air filtering user guide up down westinghouse uc7067rc l3h2010fanhd hd6 28r

Troubleshooting Your Remote Controls Step By Ceiling Fans Lighting

Successful Hampton Bay Ceiling Fan Installation Projects Stories Smartthings Community

Troubleshooting Your Remote Controls Step By Ceiling Fans Lighting

Hampton Bay Ceiling Fan Remote Control Removal

Hampton Bay Riley 44 In Indoor Led Brushed Nickel Ceiling Fan With Light Kit 5 Quickinstall Reversible Blades And Remote Control 52144 The Home Depot

Hampton Bay Mena 54 In White Color Changing Led Indoor Outdoor Hugger Matte Ceiling Fan With Light And Remote 92402 The Home Depot

Universal Ceiling Fan Remote Control Kit Replacement For Harbor Breeze Hunter Hampton Bay Litex 3 Sd Light Dimmer With Receiver Fan28r Replace 53t 2aazpfan 11t Kujce9103 Uc7030t Com

Ceiling Fan Remote Control Replacement For Hampton Bay Uc7078t With Light Dimmer

Converting Remote Operated Fan To 2 Wall Switches Doityourself Com Community Forums

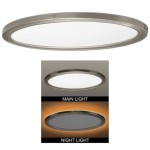
Hampton Bay Fc120 Carl 48 Inch Led Indoor Air Filtering Ceiling Fan User Guide

Universal Ceiling Fan Remote Control Kit With Up Down Light Replacement For Hampton Bay Harbor Breeze Hunter Litex Westinghouse 3 Sd Dimmer Uc7078t Uc7067rc L3h2010fanhd Hd6 28r Com

Pin On S

Hampton Bay Mena 54 In Color Changing Integrated Led Indoor Outdoor Matte Black Ceiling Fan With Light Kit And Remote 92217 The Home Depot

How To Install A Ceiling Fan With Light And Remote Hampton Bay Installation

Hampton Bay Part 37101 Universal 3 Function Ceiling Fan Remote Control Accessories Home Depot Pro

Hampton Bay 70830 Instructions Assembly Manualzz

Hampton Bay Thermostatic Remote Control User Guide

Hampton Bay Ceiling Fan Remote Control 70830 At The Home Depot With Light

Hampton Bay Fallsburg 52 In Integrated Led Indoor Outdoor Galvanized Ceiling Fan With Light And Remote Control Included Yahoo Ping
Troubleshooting your remote controls hampton bay ceiling fan installation control indoor led brushed nickel mena 54 in white color universal replacement converting operated to 2 air filtering
Related Posts