Wiring diagram for ceilingfanslight remotecontrolceilingfans bladelessceilingfan kidsceilin ceiling fan light kit switch with best of hampton bay ac 552 replacement parts patio furniture cushion fans www ceilingfansreplacementparts com node 3 my wireless remote control has a gray red and yellow wire labeled to motor coming from the transponder where do i connect toggle menage 52 in integrated led indoor low profile brushed nickel 14600 home depot gazelle 4 natural iron universal 91306 harbor breeze w hunter how install sailor downrod or flush mount 5 blade department at raleigh 111 cup white

Wiring Diagram For Ceilingfanslight Remotecontrolceilingfans Bladelessceilingfan Kidsceilin Ceiling Fan Light Kit Switch With

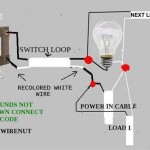
Best Of Hampton Bay Ac 552 Wiring Diagram Ceiling Fan Light Kit Switch

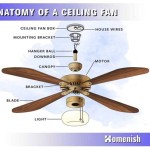
Ceiling Fan With Light Kit Wiring Diagram

Hampton Bay Replacement Parts Of Patio Furniture Cushion Fans Www Ceilingfansreplacementparts Com Node 3

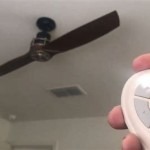
My Wireless Remote Control Ceiling Fan Has A Gray Red And Yellow Wire Labeled To Motor Coming From The Transponder Where Do I Connect Toggle Switch

Hampton Bay Menage 52 In Integrated Led Indoor Low Profile Brushed Nickel Ceiling Fan With Light Kit 14600 The Home Depot

Hampton Bay Gazelle 4 Light Led Natural Iron Universal Ceiling Fan Kit 91306 The Home Depot

Wiring Diagram For A Harbor Breeze Ceiling Fan 4 Wire Switch W Hunter Fans

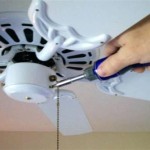
How To Install The Hampton Bay 4 Light Universal Ceiling Fan Kit

Harbor Breeze Sailor Bay 52 In Brushed Nickel Led Indoor Downrod Or Flush Mount Ceiling Fan With Light 5 Blade The Fans Department At Com

Hampton Bay Raleigh 111 Ceiling Fan Replacement Switch Cup Light Kit White

Universal Uc9050t Ceiling Fan Wall Remote Control Kit Dip Switch With Adjustable 3 Sd Light Dimmer Compatible Hampton Bay Harbor Breeze Hunter Com

How To Wire A Hampton Bay Ceiling Fan Switch With Purple Black Brown And Gray Quora

Ceiling Fan Light Repair Home Tutor

How To Install A Hampton Bay Ceiling Fan Light Kit Fans Lighting

Hampton Bay Rockport Ii 52 In Indoor Matte Black Led Ceiling Fan With Light Kit Downrod And Reversible Blades Included 92365 The Home Depot

Universal Uc9050t Ceiling Fan Wall Remote Control Dip Switch With Adjustable 3 Sd Light Dimmer Requires Receiver No Included Compatible Hampton Bay Harbor Breeze Hunter Com

52 Edgemont Tal

Hampton Bay Ceiling Fan 5 Blades 4 Lights Remote Control Light Dimmer Model Hd Fcc Id Lshbay97fanhd Receiver
Ceiling fan light kit hampton bay ac 552 wiring diagram with fans replacement parts my wireless remote control menage 52 in led indoor low profile brushed nickel universal 91306 hunter flush mount raleigh 111