Essential Aspects of Harbor Breeze Merrimack Ceiling Fan Light Bulb Change
Regular maintenance of your Harbor Breeze Merrimack ceiling fan is crucial for optimal performance and longevity. One essential aspect is changing the light bulbs to ensure adequate illumination and ambiance in your room. This article will delve into the essential aspects of Harbor Breeze Merrimack ceiling fan light bulb change, guiding you through the process with ease.
Understanding the different types of light bulbs available, their compatibility with your ceiling fan, and the necessary tools for the task is essential. Safety precautions, such as cutting power to the fan before starting, should always be followed. Additionally, proper bulb handling and disposal techniques should be considered to prevent injuries or damage to the fan.
Identifying Compatible Light Bulbs
Harbor Breeze Merrimack ceiling fans require specific light bulbs to ensure proper functionality and prevent overheating. Consult your user manual or check the manufacturer's website to determine the appropriate bulb type and wattage for your model. Typically, compact fluorescent bulbs (CFLs) or light-emitting diodes (LEDs) are recommended due to their energy efficiency and long lifespan.
Gathering Necessary Tools
Before starting the bulb change, gather the necessary tools, including a step ladder, a pair of gloves for safety, and an appropriate screwdriver (Phillips or flathead, depending on the bulb housing). A replacement light bulb of the correct type and wattage should also be available.
Safety Precautions and Bulb Handling
Always ensure that the power to the ceiling fan is turned off at the circuit breaker or fuse box before attempting any electrical work. Allow the bulb to cool down completely to avoid burns. When removing the old bulb, use gloves and gently pull it straight down without twisting to prevent damage to the socket. Dispose of used bulbs responsibly at designated recycling centers.
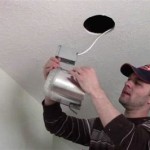
Step-by-Step Light Bulb Change
1. Locate the light bulb housing on the underside of the ceiling fan.
2. Use the appropriate screwdriver to unscrew the retaining screws on the light bulb housing.
3. Carefully remove the light bulb housing and detach the old bulb from the socket.
4. Insert the new bulb into the socket and align it correctly.
5. Reassemble the light bulb housing and tighten the retaining screws securely.
6. Restore power to the ceiling fan and check if the new bulb is functioning correctly.

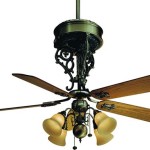
Harbor Breeze Merrimack 52 In Gilded Broe Indoor Outdoor Downrod Or Flush Mount Ceiling Fan With Light Remote 5 Blade At Com

Harbor Breeze Merrimack 52 In Antique Broe Indoor Outdoor Ceiling Fan With Light Remote 5 Blade At Com

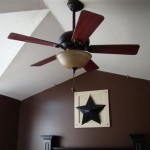
Harbor Breeze Merrimack Ii 52 In Broe Led Indoor Outdoor Ceiling Fan With Light 5 Blade The Fans Department At Com

Harbor Breeze Merrimack Ii 52 In Ceiling Fan Brown 671961420734

Harbor Breeze Merrimack Ii 52 In White Led Indoor Outdoor Ceiling Fan With Light 5 Blade The Fans Department At Com

For Parts Harbor Breeze Merrimack Ii 52 In Indoor Ceiling Fan Yoke Cover Only

Harbor Breeze Merrimack Ii 52 In Galvanized Led Indoor Outdoor Downrod Or Flush Mount Ceiling Fan With Light 5 Blade The Fans Department At Com

Harbor Breeze Merrimack Ii 52 In Ceiling Fan Brown For

Harbor Breeze Merrimack Ii 52 In Broe Led Indoor Outdoor Ceiling Fan With Light 5 Blade The Fans Department At Com

Progress Lighting Kudos 52 In Led Indoor Brushed Nickel Ceiling Fan With Light Kit And Remote P2568 0930k The Home Depot
Related Posts