Harbor Breeze Springfield Ceiling Fan Installation Guide
Installing a Harbor Breeze Springfield ceiling fan can be a great way to add style and function to your home. With a few simple tools and a bit of know-how, you can have your new fan up and running in no time.
Step 1: Gather Your Tools and Materials
Before you begin, gather all of the tools and materials you'll need for the installation. This includes:
- A screwdriver
- A drill
- A ladder
- Safety glasses
- The Harbor Breeze Springfield ceiling fan
- The mounting hardware
- Electrical wire (if you're not using the existing wiring)
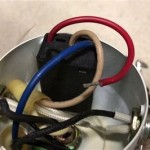
Step 2: Prepare the Electrical Wiring
If you're not using the existing wiring, you'll need to run new electrical wire from the ceiling to the location of the fan. Make sure to turn off the power to the circuit before you begin working on the wiring.
Once you have the wire run, connect it to the fan's wires. Make sure to match the colors of the wires (black to black, white to white, and green to green).
Step 3: Mount the Ceiling Fan Bracket
The ceiling fan bracket is what will hold the fan in place. It needs to be securely mounted to the ceiling joists.
To mount the bracket, first locate the ceiling joists using a stud finder. Then, drill pilot holes for the screws. Finally, drive the screws into the pilot holes and tighten them until the bracket is secure.
Step 4: Hang the Ceiling Fan
Once the bracket is mounted, you can hang the ceiling fan. To do this, simply lift the fan up and onto the bracket. Then, secure the fan to the bracket with the screws that are provided.
Step 5: Install the Blades
The next step is to install the blades. To do this, simply insert the blades into the slots on the fan motor. Then, secure the blades with the screws that are provided.
Step 6: Install the Light Kit (Optional)
If you're installing a light kit, you'll need to do so now. To do this, simply follow the instructions that are included with the light kit.
Step 7: Turn on the Power and Test the Fan
Once everything is installed, turn on the power to the circuit and test the fan. Make sure that the fan is running smoothly and quietly.
Troubleshooting
If you encounter any problems during the installation, here are a few tips:
- If the fan is not running, check the electrical connections.
- If the fan is wobbling, make sure that the blades are properly balanced.
- If the fan is making a noise, check for loose screws or other problems.

Harbor Breeze Springfield 52 In Ceiling Fan With Light Kit 5 Blade At Com

Harbor Breeze Springfield 52 In Ceiling Fan With Light Kit 5 Blade At Com

Harbor Breeze Aero Ceiling Fan E Aer52brz5lkrci User Manual Manualslib

Harbor Breeze Springfield 52 In Brushed Nickel Indoor Downrod Or Flush Mount Ceiling Fan With Light 5 Blade At Com

Harbor Breeze Springfield 52 In Antique Broe Indoor Downrod Or Flush Mount Ceiling Fan With Light 5 Blade At Com

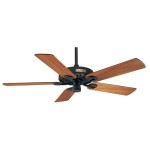
Harbor Breeze Springfield 52 In Matte Black Candelabra Base E 12 Indoor Downrod Or Flush Mount Ceiling Fan With Light 5 Blade At Com

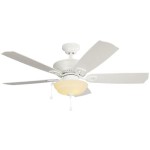
Harbor Breeze Springfield 52 In White Ceiling Fan With Light Kit 5 Blade At Com

Harbor Breeze Springfield 52 In Ceiling Fan With Light Kit 5 Blade At Com

Harbor Breeze Springfield Ii 52 In Brushed Nickel Indoor Downrod Or Flush Mount Ceiling Fan With Light 5 Blade At Com

An Overview Of The Harbor Breeze Ceiling Fan
Related Posts