High Ceiling Light Replacement: An Essential Guide
High ceiling lights are a crucial element of any spacious interior, providing ample illumination and contributing to the overall ambiance of the space. However, replacing these lights can be a daunting task, especially considering their height and the potential risks involved. This guide will equip you with the essential knowledge and safety measures to ensure a successful high ceiling light replacement.
Safety First
Before embarking on the replacement, prioritize safety by following these precautions:
- Turn off the electricity at the circuit breaker or fuse panel.
- Wear gloves and safety glasses for protection.
- Use a sturdy ladder and ensure it is stable before climbing.
- Have someone assist you to hold the ladder and provide support.
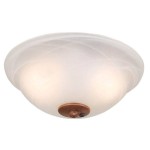
Choosing the Right Light Fixture
Select a light fixture that matches the style, size, and electrical requirements of your room. Consider the following factors:
- Height: Ensure the fixture's height is appropriate for the ceiling height.
- Wattage: Determine the desired light intensity and choose a fixture with the appropriate wattage.
- Mounting Type: Choose a fixture that matches the mounting method (e.g., flush mount, pendant, chandelier).
Step-by-Step Replacement Procedure
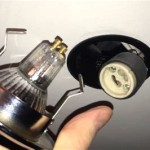
- Remove the Old Fixture:
- Disconnect the wires (typically black, white, and green)
- Unscrew the mounting screws and carefully lower the fixture.
- Prepare the Wires:
- Strip about 1 inch of insulation from the ends of the wires.
- Use wire nuts to connect the same color wires (black to black, white to white).
- Mount the New Fixture:
- Lift the new fixture into place and secure it with the mounting screws.
- Push the excess wire into the electrical box.
- Reconnect the Wires:
- Twist the wire nuts together firmly.
- Push the wire nuts into the electrical box.
- Install the Bulbs: Install the appropriate light bulbs into the fixture.
- Turn on the Power: Restore power to the circuit breaker or fuse panel.
Tips for Ease and Safety
- Use a telescopic ladder for extended reach.
- Consider using a remote control switch for convenience.
- If you encounter any electrical issues, contact a licensed electrician.
- Wear sturdy shoes with good grip.
- Allow the light fixture to cool down before handling.
By following these steps and adhering to safety precautions, you can successfully replace high ceiling lights and enhance the illumination and aesthetics of your space.

Mr Longarm Light Bulb Changing Pole Attachment For Tall Ceilings

How To Change Light Bulb In High Ceiling Home Inspection Geeks

5 12 Foot Docapole Light Bulb Changer High Ceiling Extension Pole Com

Home Lightbulb Scaffold

Light Bulb Changer High Ceiling Replacement Tools

How To Change Light Bulb In High Ceiling Tools For Kitchen Bathroom

How To Change Light Bulb In High Ceiling Home Inspection Geeks

Best Light Bulb Changer For High Ceilings And Extension Pole 2024 Ezx

High Ceiling Light Bulb Changer Removal Tool Remover Recessed For Outdoor Bedroom Home Lights Com

Tips For Changing A Light Bulb On High Ceiling
Related Posts