How Do You Wire A Ceiling Fan With Light Kit
Installing a ceiling fan with a light kit can be a great way to improve the airflow and lighting in your home. While it may seem like a daunting task, it is actually quite simple with the right tools and instructions. Here is a step-by-step guide on how to wire a ceiling fan with a light kit:
Materials You'll Need:
- Ceiling fan with light kit
- Electrical tape
- Wire nuts
- Screwdriver
- Electrical tester
Safety First:
Before you begin, make sure to turn off the power to the circuit that you will be working on. You can do this by flipping the breaker or removing the fuse. Also, be sure to wear safety glasses and gloves when working with electrical components.
Step 1: Mount the Ceiling Fan Bracket
The first step is to mount the ceiling fan bracket to the electrical box in the ceiling. The bracket will typically come with screws that you can use to secure it to the box. Make sure that the bracket is level and tight.
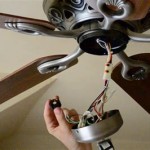
Step 2: Connect the Wires
Once the bracket is mounted, you need to connect the wires from the ceiling fan to the wires from the electrical box. The wires from the ceiling fan will typically be black, white, and green. The wires from the electrical box will typically be black, white, and red.
Connect the black wire from the ceiling fan to the black wire from the electrical box. Connect the white wire from the ceiling fan to the white wire from the electrical box. Connect the green wire from the ceiling fan to the bare copper ground wire from the electrical box.
Use wire nuts to secure the connections. Make sure that the wire nuts are tight and that no bare wire is exposed.
Step 3: Install the Light Kit
Once the wires are connected, you can install the light kit. The light kit will typically come with instructions on how to install it. Follow the instructions carefully.
Step 4: Test the Ceiling Fan
Once the light kit is installed, you can turn the power back on and test the ceiling fan. The ceiling fan should now be working properly.
Troubleshooting:
If the ceiling fan is not working properly, there are a few things you can check:
- Make sure that the power is turned on.
- Check the connections to make sure that they are tight and secure.
- Make sure that the light bulbs are working.
- If you have checked all of the above and the ceiling fan is still not working, you may need to call an electrician.
Conclusion:
Wiring a ceiling fan with a light kit is a relatively simple task that can be completed in a few hours. By following the steps in this guide, you can safely and easily install a ceiling fan that will improve the comfort and style of your home.

Wiring A Ceiling Fan And Light With Diagrams Ptr

Wiring A Ceiling Fan And Light With Diagrams Ptr

How To Install A Ceiling Fan Lowe S

Wiring A Ceiling Fan And Light With Diagrams Ptr

Wiring Ceiling Fan Light Kit Removing A Wire Cap Doityourself Com Community Forums

Ceiling Box Fan Electrical Wiring Control Switch How To Install A Light Kit S Archives

Help Installing Ceiling Fan Light Kit R Askanelectrician

Removing Old Ceiling Fan Wiring A New

How To Wire A Ceiling Fan The Home Depot

Changing Ceiling Fan Light Kit Doityourself Com Community Forums
Related Posts