How To Add Ceiling Lights In a Manufactured Home
Adding ceiling lights to a manufactured home requires careful planning and execution. Unlike site-built homes, manufactured homes often have unique construction elements that necessitate specific installation techniques. This guide outlines the steps involved in safely and effectively adding ceiling lights to a manufactured home.
Understanding Manufactured Home Construction: Before starting any electrical work, it's crucial to understand the structural differences of a manufactured home. These homes typically feature a metal frame, with ceiling trusses spaced closer together than in traditional homes. The ceiling is often composed of thin panels, requiring special attention when mounting fixtures.
Safety First: Electrical work poses inherent risks. Always turn off the power to the circuit at the main breaker panel before starting any electrical project. Use a voltage tester to double-check that the power is off. If unsure about any part of the process, consult a qualified electrician.
Planning and Placement: Determine the desired location for the new ceiling light. Consider the room's layout, furniture placement, and existing light sources. Ensure the chosen location doesn't interfere with ceiling joists, wiring, or ductwork. A stud finder can help locate the ceiling joists.
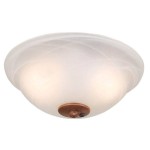
Choosing the Right Fixture: Select a ceiling light fixture that complements the room's aesthetic and provides adequate illumination. For low ceilings, flush-mount or semi-flush-mount fixtures are ideal. Chandeliers or pendant lights are suitable for rooms with higher ceilings. LED lights offer energy efficiency and long lifespans.
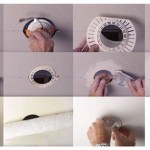
Accessing the Ceiling: Depending on the construction of the manufactured home, the ceiling might be accessed through an attic space or directly through the ceiling panel. If there's an attic, access can be gained through a designated access panel. If no attic exists, a small hole will need to be cut in the ceiling panel for fixture installation and wiring access. This hole should be strategically placed to be covered by the fixture's base.
Wiring the Fixture: If the desired fixture location is near an existing ceiling light, it's often possible to extend the wiring from that existing fixture. This involves running new electrical cable from the old junction box to the new fixture location. Secure the cable to the ceiling joists using cable staples, ensuring it's routed safely and away from any potential hazards. If no nearby fixture exists, a new electrical circuit might need to be run from the main panel, which is best handled by a qualified electrician.
Installing the Junction Box: A junction box is necessary to house the electrical connections. If accessing through the attic, the junction box can be mounted directly to a ceiling joist. If working through a hole in the ceiling panel, a special remodel junction box designed for this purpose should be used. Securely attach the junction box according to the manufacturer's instructions.
Making the Electrical Connections: Carefully connect the wires from the ceiling light fixture to the corresponding wires in the junction box. Match the wire colors: black to black (hot), white to white (neutral), and green or bare copper to ground. Use wire nuts to secure the connections, ensuring they are tight and properly capped.
Mounting the Fixture: Once the wiring is complete, attach the ceiling light fixture to the junction box or mounting bracket according to the manufacturer's instructions. Ensure the fixture is securely mounted and flush with the ceiling.
Testing the Connection: After installing the fixture, restore power to the circuit at the main breaker panel. Test the new ceiling light to ensure it functions correctly. If the light doesn't work, double-check all connections and ensure the power is on.
Finishing Touches: If working through a hole in the ceiling panel, carefully patch and repair the area around the fixture base. Use spackle or joint compound to fill any gaps and create a smooth surface. Once dry, sand the area and repaint to match the existing ceiling.
Working with Different Ceiling Materials: Different ceiling materials require slightly different approaches. Drywall ceilings allow for easier cutting and patching. For ceilings with other materials, such as textured panels, extra care is needed to minimize damage and ensure a clean finish after installation.
Regulations and Permits: Local building codes and regulations may require permits for electrical work. Check with the local authorities before starting any electrical project to ensure compliance. Permitting processes help ensure the safety and quality of electrical installations.
Professional Assistance: While adding a ceiling light can be a DIY project, it's always advisable to consult with a qualified electrician if there are any uncertainties. Electrical work can be dangerous, and a professional electrician can ensure the work is done safely and correctly, adhering to all applicable codes and regulations.

How To Install Recessed Ceiling Lights In 8 Steps

I M An Instrumentation Graduate And Want To Install My Mobile Home With 11 Interior Ceiling Light Fixtures As Well 2 Exterior Honorable Electricians Of Reddit Please Offer Tips

How To Install Exposed Beams In Your Mobile Home Us Pros

10 Materials To Replace Your Mobile Home Ceilings Living

5 Great Manufactured Home Interior Design Tricks Mobile Living

How To Install Exposed Beams In Your Mobile Home Us Pros

How To Cover A Popcorn Ceiling Without Removing It Rocky Hedge Farm

10 Materials To Replace Your Mobile Home Ceilings Living

Dream Lighting 2 76 Led Recessed Ceiling Light For Rv Trailer Caravan Boat Warm White 12volts 10 Pack

Tongue And Groove Ceiling Installation In A Small Rv Ifleld Court
Related Posts