How to Change a Ceiling Light Cord
Replacing a ceiling light cord is a relatively simple task that can be completed in a few minutes. However, it is important to take the necessary precautions to ensure that the job is done safely and correctly. In this article, we will discuss the essential steps involved in changing a ceiling light cord and provide some tips for ensuring a safe and successful installation.
Safety Considerations
Before beginning any work, it is important to turn off the power to the circuit that powers the light fixture. This can be done by flipping the appropriate breaker in your home's electrical panel. Once the power is off, you can safely remove the old cord and install the new one.
Materials Needed
In addition to the new light cord, you will need the following materials:
- A wire stripper
- Electrical tape
- A screwdriver
- A ladder
Removing the Old Cord
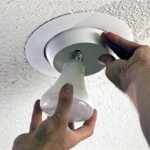
Once you have gathered your materials, you can begin removing the old cord. First, use the screwdriver to remove the screws that hold the light fixture in place. Once the screws are removed, carefully lower the light fixture from the ceiling. Be careful not to drop the light fixture, as this could damage the fixture or the ceiling.
Once the light fixture is removed, you can disconnect the old cord from the electrical wires. To do this, simply unscrew the wire nuts that connect the cord to the wires. Once the wire nuts are removed, you can pull the old cord out of the fixture.
Installing the New Cord
Now that the old cord is removed, you can install the new cord. First, strip about 1/2 inch of insulation from the ends of the new cord. Then, twist the exposed wires together. Next, wrap electrical tape around the twisted wires to create a secure connection.
Once the wires are connected, you can screw the wire nuts onto the connectors. Make sure that the wire nuts are tightened securely. Finally, tuck the new cord into the fixture and reattach the fixture to the ceiling.
Testing the Light
Once the new cord is installed, you can turn the power back on and test the light. If the light does not turn on, check the connections to make sure that they are secure. If the connections are secure, the problem may be with the light fixture itself.
Conclusion
Changing a ceiling light cord is a relatively simple task that can be completed in a few minutes. By following the steps outlined in this article, you can ensure that the job is done safely and correctly. If you have any questions or concerns, it is always best to consult with a qualified electrician.

How To Replace Install A Light Fixture The Art Of Manliness

How To Install A Ceiling Light Fixture Diy Family Handyman

How To Replace A Ceiling Fan With Pendant Light

How To Change A Ceiling Light With Pictures Wikihow

How To Install A Ceiling Light Fixture Diy Family Handyman

How To Change A Light Fixture House Of Hipsters

Inside The Circuit Pendant Lighting Light Switch Wiring Homeowner Faqs

How To Replace Install A Light Fixture The Art Of Manliness

How To Install A Ceiling Light Fixture Diy Family Handyman

Replacing A Ceiling Fan Light With Regular Fixture Jlc
Related Posts