How to Change Light Switch in Harbor Breeze Ceiling Fan
Harbor Breeze ceiling fans often feature built-in light switches to control the attached lighting fixtures. Changing a faulty or damaged switch is a relatively simple task that can be completed in a matter of minutes. Here's a step-by-step guide to help you through the process:
Materials Needed:- New light switch compatible with your Harbor Breeze ceiling fan
- Screwdriver (Phillips or flathead, depending on the switch type)
- Wire stripper (optional)
Before starting any electrical work, it's crucial to turn off the power supply to the ceiling fan at the circuit breaker or fuse box. This ensures your safety and prevents electrical shock.
Step 2: Access the Light SwitchLocate the light switch on the fan's housing. It is typically situated near the fan's motor or on the canopy that connects the fan to the ceiling. Remove the switch cover using a screwdriver to expose the switch.
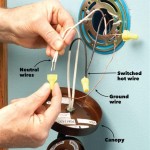
Step 3: Disconnect the WiresIdentify the wires connected to the switch terminals. They are usually color-coded: black for the "hot" wire, white for the "neutral" wire, and green or bare copper for the "ground" wire. Using a screwdriver, loosen the terminal screws and carefully disconnect the wires from the switch.
Optional: Strip Wire Ends
For a more secure connection, you can strip about 1/2 inch of insulation from the ends of the wires using a wire stripper. This exposes the bare copper wires, which makes them easier to insert into the new switch's terminals.
Step 4: Connect the Wires to the New SwitchMatch the wire colors to the corresponding terminals on the new switch. Connect the black wire to the "hot" terminal, the white wire to the "neutral" terminal, and the green or bare copper wire to the "ground" terminal. Tighten the terminal screws securely using a screwdriver.
Step 5: Reinstall the Light SwitchSlide the new light switch back into place on the fan's housing. Ensure it fits securely and is properly aligned. Secure the switch cover with the screws you removed earlier.
Step 6: Restore Power and TestTurn the power back on at the circuit breaker or fuse box. Operate the light switch to verify if it is functioning correctly. The light attached to your ceiling fan should turn on and off smoothly.
ConclusionReplacing a light switch in a Harbor Breeze ceiling fan is a straightforward and manageable task. By following these steps and taking safety precautions, you can quickly restore the fan's lighting functionality. If you encounter any difficulties or are unfamiliar with electrical work, it's always advisable to seek professional assistance from a qualified electrician.
How To Wire A Harbor Breeze Fan And Light 2 Switches Quora

How To Install A Ceiling Fan Two Wall Switches What Bb Built

Harbor Breeze 2 Setting Chrome Ceiling Fan Switch In The Accessories Department At Com

Harbor Breeze 3 Setting Chrome Ceiling Fan Switch In The Accessories Department At Com

Ceiling Fan Light Repair Home Tutor

Converting Remote Operated Fan To 2 Wall Switches Doityourself Com Community Forums

Harbor Breeze 1 In 2 Setting Brass Metal Indoor Universal Ceiling Fan Switch The Accessories Department At Com

Harbor Breeze Ceiling Fan Light Switch Lowe S

Harbor Breeze Ceiling Fan Wiring Questions Doityourself Com Community Forums

4 Ways To Replace A Light Bulb In Ceiling Fan Wikihow
Related Posts

