How To Install A Ceiling Light Fixture Without Existing Wiring
Installing a ceiling light fixture where no wiring exists requires careful planning and execution. This process involves running new electrical wiring from a power source to the desired fixture location. While this task can be complex, a methodical approach makes it achievable for experienced DIY enthusiasts. However, consulting a licensed electrician is always recommended for individuals unfamiliar with electrical work, as improper wiring can create safety hazards.
The first step involves identifying a suitable power source. A nearby junction box is often the best option. If no junction box is readily accessible, connecting to an existing wall outlet circuit may be possible. Understanding the circuit's load capacity is crucial to prevent overloading. Adding a new circuit directly from the electrical panel is sometimes necessary, and this task often requires the expertise of a qualified electrician due to the complexities and safety considerations involved.
Once a power source is identified, the next step focuses on planning the wiring route. This step requires careful consideration of building codes and structural elements. Running wires through walls or ceilings necessitates compliance with local regulations regarding fire blocking and insulation. Ceiling joists and wall studs provide convenient pathways for wiring, often requiring drilling holes. A fish tape or similar tool proves invaluable for navigating wires through these spaces.
Before beginning any electrical work, turning off the power to the circuit at the breaker box is essential. This precaution prevents electrical shock and ensures safety during the installation process. Verifying the power is off using a non-contact voltage tester is an additional safety measure.
With the power off, the next step involves running the wiring from the power source to the fixture location. Romex cable, commonly referred to as NM cable, is typically used for this purpose. The cable should be secured to structural members using cable staples at regular intervals, ensuring the cable is not strained or loosely hanging. At the power source, the cable needs to be properly connected, following all relevant electrical codes. This usually involves stripping the outer sheathing, connecting the ground wire to the ground screw, the neutral wire to the neutral wire of the circuit, and the hot wire to the hot wire of the circuit. If connecting to a junction box, appropriate wire connectors must be used to secure the connections.
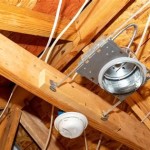
At the fixture location, a new electrical box must be installed to house the fixture's wiring and provide secure mounting. The type of box will depend on the fixture's weight and mounting method. A ceiling fan, for example, requires a specific type of box rated for the weight and motion of the fan. Securely attaching the box to a ceiling joist or other suitable structural support is critical.
Once the electrical box is installed, the wiring from the power source can be pulled through into the box. Leaving sufficient wire length within the box (typically 6-8 inches) allows for easier connection to the fixture. The cable must be secured to the box using an appropriate cable clamp.
Next, the ceiling light fixture can be prepared for installation. This typically involves connecting the fixture's wires to the wires coming from the power source: black to black (hot), white to white (neutral), and green or bare copper to green or bare copper (ground). Wire connectors are used to secure these connections. The fixture's mounting bracket is then attached to the electrical box, and the fixture is secured to the bracket according to the manufacturer's instructions.
After the fixture is installed, the power can be restored at the breaker box. Testing the fixture's operation confirms the successful completion of the installation process. Observing the fixture for any signs of overheating or unusual behavior is a crucial final step.
Different types of ceiling lights and mounting situations may present unique challenges. Recessed lighting, for instance, requires specific housing and considerations for insulation. Track lighting involves installing multiple fixture heads along a track system. Consulting the manufacturer's instructions for the specific fixture being installed is always essential.
Working with electricity requires a thorough understanding of safety procedures. Using appropriate personal protective equipment, such as safety glasses and gloves, is recommended. Double-checking all connections and ensuring proper grounding are critical for preventing electrical hazards. When in doubt, seeking professional assistance is always the safest course of action.

How To Hang A Ceiling Light Without Wiring Hawk Hill

Replacing A Ceiling Fan Light With Regular Fixture Jlc

How To Install A Ceiling Light Fixture Without Existing Wiring The Fancy Place

How To Hang A Ceiling Light Without Wiring Hawk Hill

How To Get Overhead Lighting Without Wiring Design Morsels

How To Hang A Ceiling Light Without Wiring Hawk Hill

How To Install Ceiling Light Homeserve Usa

Installing Wiring A Flush Mount Light To Concrete Ceiling Without An Existing Box Up There R Askanelectrician

Installing A Ceiling Fan Without Existing Wiring Electricians Talklocal Blog Talk Local

How Much Does It Cost To Install A Ceiling Light Without Existing Wiring Quora
Related Posts