How to Install a LED Flush Mount Ceiling Light
Installing a LED flush mount ceiling light is a relatively simple task that can be completed in a few hours. By following these step-by-step instructions, you can easily update the lighting in your home or office.
Materials and Tools
- LED flush mount ceiling light
- Screwdriver
- Drill
- Wire strippers
- Electrical tape
- Wire nuts
- Safety glasses
Safety Precautions
Before beginning any electrical work, it is important to take the following safety precautions:
- Turn off the power to the circuit at the breaker panel.
- Wear safety glasses to protect your eyes from flying debris.
- Do not attempt to install a light fixture if you are not comfortable working with electricity.
Step-by-Step Instructions
1. Remove the Old Light Fixture
If you are replacing an existing light fixture, you will need to remove it before installing the new one. To do this, simply unscrew the screws that hold the fixture in place and carefully pull it down from the ceiling.
2. Connect the Wires
Once the old light fixture is removed, you will need to connect the wires from the new fixture to the wires in the ceiling. To do this, strip about 1/2 inch of insulation from the ends of the wires and twist the exposed wires together. Then, wrap the connection with electrical tape.
3. Mount the Light Fixture
Once the wires are connected, you can mount the light fixture to the ceiling. To do this, hold the fixture in place and insert the screws into the holes in the mounting bracket. Tighten the screws until the fixture is securely attached.
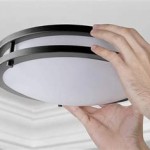
4. Install the Diffuser
The diffuser is the glass or plastic cover that covers the light bulb. To install the diffuser, simply place it over the light bulb and twist it into place.
5. Turn on the Power
Once the light fixture is installed, you can turn on the power at the breaker panel. The light should now be working properly.
Troubleshooting
If you are having trouble installing your LED flush mount ceiling light, there are a few things you can check:
- Make sure that the power is turned off at the breaker panel.
- Check the connections between the wires to make sure that they are secure.
- Make sure that the light bulb is properly installed.
- If you are still having trouble, you may need to contact an electrician for assistance.
Conclusion
Installing a LED flush mount ceiling light is a simple task that can be completed in a few hours. By following these step-by-step instructions, you can easily update the lighting in your home or office.

16w Led Flush Mount Ceiling Light Dimmable 10 5 Inch Brushed Nickel White Lepro

Led Flush Mount Ceiling Light Fixture 12 Inch 24w 3200lm 4000k Neutr Freeamzs

The Ultimate Flush Ceiling Light Installation And Guide 21 22 Fancy Place

How To Install Flush Mount Ceiling Lights

Commercial Electric 9 In Color Selectable Led Flush Mount Ceiling Light W Night Optional White And Brushed Nickel Trim Rings 56582191 The Home Depot

Flush Mount Ceiling Lights Waterproof Led Le

Noma Double Ring Led Flush Mount Ceiling Light Fixture Matte Black 15 In Canadian Tire

Flush Mount Ceiling Light 13 Brushed Nickel Kitchen Bedroom Hallway Noma

Commercial Electric Spin Light 5 In Closet Basement Utility Led Flush Mount Ceiling 600 Lumens 4000k Bright White 8 Pack 54692141 8pk The Home Depot

Torontoled 14 In White Integrated Led Flush Mount Light Rona
Related Posts