Essential Aspects of Installing a Hampton Bay Ceiling Fan With Remote
Installing a Hampton Bay ceiling fan with a remote controller can significantly improve the comfort and aesthetics of your room. Follow these comprehensive instructions to ensure a successful installation:
Safety Precautions
Prior to installation, ensure the following safety measures are met:
- Turn off the power at the electrical panel.
- Use a non-conductive ladder for safety.
- Wear safety glasses to protect your eyes from debris.
Assembling the Fan
Assemble the fan components according to the manufacturer's instructions:
- Attach the fan blades to the blade arms.
- Secure the motor housing to the mounting bracket.
- Connect the wires according to the wiring diagram.
Preparing the Electrical Box
Ensure the electrical box is secure and rated for the weight of the fan:
- Tighten any loose screws or bolts.
- Use a fan-rated electrical box that can support the weight of the entire assembly.
Installing the Mounting Bracket
Attach the mounting bracket to the electrical box:
- Align the mounting bracket with the electrical box holes.
- Use the provided screws to secure the bracket.
- Ensure the bracket is securely fastened and level.
Hanging the Fan
Hang the fan on the mounting bracket:
- Lift the fan assembly onto the mounting bracket.
- Align the holes on the fan with the slots on the bracket.
- Secure the fan to the bracket using the provided hanger ball.
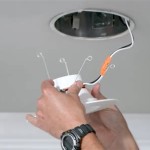
Connecting the Wires
Connect the fan wires to the electrical wires:
- Match the colors of the wires according to the wiring diagram.
- Use wire nuts to create secure connections.
- Wrap electrical tape around the wire nuts to prevent disconnection.
Installing the Remote Receiver
Mount the remote receiver inside the fan housing:
- Locate the designated area for the receiver.
- Connect the receiver wires to the fan wires.
- Secure the receiver in place using the provided screws.
Pairing the Remote
Pair the remote control with the fan receiver:
- Follow the instructions provided in the manufacturer's manual.
- Usually involves pressing a button on the remote and receiver simultaneously.
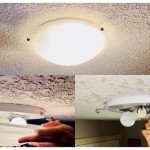
Completing the Installation
Finish the installation process:
- Install the light kit (if included).
- Replace the fan canopy and secure it with screws.
- Turn on the power at the electrical panel.
Troubleshooting Common Issues
In case of any issues, check:
- If the fan is receiving power.
- If the remote is properly paired.
- If the wires are connected securely.
Additional Tips
- Consider the size and height of the room when selecting the fan.
- Use anti-vibration pads to reduce noise and vibration.
- Regularly clean the fan blades to maintain airflow.

Hampton Bay Remote Installation Instructions Ehow

Troubleshooting Your Remote Controls Step By Hampton Bay Ceiling Fans Lighting

Hampton Bay Lakemoore 48 In Led Indoor Outdoor Matte Black Ceiling Fan With Light Kit 50248 The Home Depot

Hampton Bay Universal 3 Sd Damp Rated Ceiling Fan Remote Control With Dimming Black 98130 The Home Depot

Hampton Bay 3 Sd Universal Ceiling Fan Thermostatic Remote Control

Hampton Bay Ceiling Fan 5 Blades 4 Lights Remote Control Light Dimmer Model Hd Fcc Id Lshbay97fanhd Receiver

Converting Remote Operated Fan To 2 Wall Switches Doityourself Com Community Forums

Riley 44 In Indoor Led Brushed Nickel Ceiling Fan With Light Kit 5 Quickinstall Reversible Blades And Remote Control Com

Hampton Bay Midili 44 In Indoor Led Brushed Nickel Dry Rated Ceiling Fan With 5 Reversible Blades Light Kit And Remote Control 68044 The Home Depot

Hampton Bay Ceiling Fan Only Going In Clockwise Will Not Switch To Counterclockwise R Fixit
Related Posts