How To Install Insulated Ceiling Pot Lights
Recessed lighting, often referred to as pot lights or can lights, offers a sleek, modern aesthetic and directional illumination. Installing insulated ceiling (IC) rated pot lights, designed for direct contact with insulation, is a relatively straightforward process for experienced DIYers. However, it requires careful attention to detail and adherence to safety protocols. This guide provides a comprehensive walkthrough of the installation process.
Safety First: Before commencing any electrical work, always disconnect the power to the circuit at the main electrical panel. Verify the power is off using a non-contact voltage tester. Working with electricity can be dangerous; if unsure about any step, consult a qualified electrician.
Planning and Preparation: Begin by determining the optimal placement and number of pot lights. Consider the room's size, function, and desired lighting effect. Measure the ceiling joist spacing to ensure proper fixture placement and avoid obstructions. Gather all necessary tools and materials, including IC-rated pot lights, electrical wire (typically 14/2 or 12/2 gauge, depending on circuit requirements), wire connectors, wire strippers, a hole saw, safety glasses, and a voltage tester.
Choosing the Right Pot Lights: Select IC-rated pot lights specifically designated for direct contact with insulation. This rating is crucial for fire safety and preventing overheating. Choose the appropriate wattage and color temperature (measured in Kelvin) to achieve the desired lighting effect. Consider features such as adjustable trims, dimming capabilities, and integrated LED options.
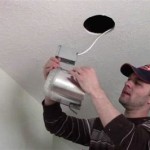
Marking and Cutting the Holes: Using a template provided with the pot lights or by tracing the fixture's housing, mark the desired location on the ceiling. Double-check measurements to ensure accurate placement. Using the appropriate size hole saw (specified by the manufacturer), carefully drill the holes in the ceiling. Use a dust mask and safety glasses to protect against debris.
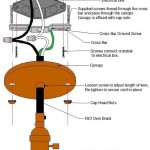
Wiring the Pot Lights: Run the electrical wiring from the existing junction box to each pot light location. Follow local electrical codes for proper wiring methods and box placement. If necessary, install new junction boxes to accommodate the additional fixtures. Use appropriate wire connectors to secure the wires to the fixture's leads, ensuring tight and secure connections. The typical wiring configuration involves connecting the black (hot) wire to the black fixture wire, the white (neutral) wire to the white fixture wire, and the bare copper or green (ground) wire to the fixture's grounding screw or wire.
Installing the Pot Lights: Carefully push the pot light housing into the cut hole, ensuring the clips or springs secure the fixture to the ceiling. Some fixtures may require screwing the housing to the ceiling joists. Ensure the wiring is tucked neatly within the housing and does not interfere with the fixture's proper seating. If using remodeler style housings, secure them to the ceiling using the integrated clips or brackets.
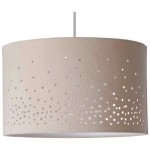
Connecting the Trim: Once the housing is securely installed, attach the trim to the fixture according to the manufacturer's instructions. This typically involves twisting or snapping the trim into place. Different trims offer various aesthetic options, such as baffles, reflectors, or adjustable directional features.
Testing the Installation: After completing the wiring and installation for all pot lights, restore power to the circuit. Test each fixture to ensure it functions correctly. If any issues arise, immediately disconnect the power and troubleshoot the wiring connections.
Insulation Contact: IC-rated pot lights are designed for direct contact with insulation. Ensure the insulation is placed around the housing without compressing or obstructing the fixture's ventilation. This maintains proper airflow and prevents overheating.
Final Inspection: Once the installation is complete, conduct a thorough inspection to ensure all connections are secure, the fixtures are properly seated, and the trims are correctly installed. Verify compliance with local electrical codes and regulations. If any concerns arise, consult a qualified electrician.
Installing IC-rated pot lights can enhance the aesthetics and functionality of any space. By following these steps and adhering to safety protocols, homeowners can achieve professional-looking results while ensuring a safe and efficient lighting solution.

Recessed Lights Covered With Insulation Electrical Inspections Internachi Forum

How To Use Insulated Can Lights In Ceilings Diy

Downlights And Recessed Lights Smarter Homes

How To Seal Recessed Light Fixtures For Energy Efficiency Today S Homeowner

How To Install Recessed Lighting Fixthisbuildthat

Air Sealing Recessed Light Fixtures Below Unconditioned Space Building America Solution Center

Can I Cover Downlights With Insulation

Attic Insulation Ceilings Installation Instructions

Energy Star Ask The Experts S

Insulating And Air Sealing Existing Non Icat Recessed Lights Building America Solution Center
Related Posts