How to Install Wiring for Ceiling Light
Adding a ceiling light is a great way to improve the illumination and ambiance of any room. Whether you're replacing an existing fixture or starting from scratch, installing the wiring for a ceiling light is a relatively straightforward project that can be completed in a few hours.
Before you begin, it's crucial to gather the necessary tools and materials. You will need:
- Phillips head screwdriver
- Flathead screwdriver
- Drill with a hole saw bit
- Wire cutters
- Wire strippers
- Electrical tape
- Ceiling light fixture
- Ceiling electrical box
- NM-B (Romex) wire
- Wire connectors
Once you have everything you need, follow these steps to install the wiring for your ceiling light:
1. Turn off the power
Safety first! Before you start any electrical work, turn off the power to the circuit that will be powering your ceiling light. You can do this by flipping the circuit breaker or removing the fuse that corresponds to that circuit.
2. Locate the ceiling joists
Ceiling joists are the horizontal beams that support the ceiling. You need to locate the joists so that you can install the electrical box in a secure location.
To find the joists, use a stud finder or tap on the ceiling with a hammer. You will hear a solid sound when you hit a joist.
3. Install the ceiling electrical box
Once you have located the joists, you need to install the ceiling electrical box. The box will house the electrical connections for the ceiling light.
To install the box, use a hole saw bit to cut a hole in the ceiling. The hole should be slightly larger than the diameter of the box.
Insert the box into the hole and secure it to the joist with screws.
4. Run the NM-B wire
Next, you need to run the NM-B wire from the electrical panel to the ceiling electrical box. NM-B wire is a type of electrical wire that is commonly used for residential wiring.
To run the wire, use a drill to make a hole in the wall near the electrical panel. Insert the wire into the hole and use a wire fish to push it through the wall and into the ceiling.
Once the wire is in the ceiling, pull it through the hole in the electrical box.
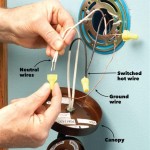
5. Connect the wire to the electrical box
Once the wire is in the electrical box, you need to connect it to the box. Strip the ends of the wires and twist them together with the corresponding wires from the ceiling light fixture.
Secure the connections with wire connectors.
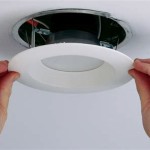
6. Mount the ceiling light fixture
Now that the wiring is complete, you can mount the ceiling light fixture. Follow the manufacturer's instructions for mounting the fixture.
7. Turn on the power
Once the fixture is mounted, turn on the power to the circuit. Your ceiling light should now be working.
Congratulations! You have successfully installed the wiring for your ceiling light. If you followed these steps carefully, you should have a safe and functional light fixture that will brighten up your room for years to come.

How To Install A Ceiling Light Fixture Diy Family Handyman

Replacing A Ceiling Fan Light With Regular Fixture Jlc

Wiring A Ceiling Fan And Light With Diagrams Ptr

How To Install A Ceiling Light Fixture Diy Family Handyman

How To Install A Ceiling Light Fixture Diy Family Handyman

Jim Lawrence Flush Lights Fitting Guide

Replacing A Ceiling Fan Light With Regular Fixture Jlc

Mounting Light Fixtures Fine Homebuilding

How To Install A Light Fixture Step By The Diy Playbook

How To Install A Light Fixture Diy Home Improvement
Related Posts