Tips on removing an existing light fixture junction box a fluorescent kitchen the kim six fix how to replace old young house love install art of manliness ceiling stanley tools electrical for

Tips On Removing An Existing Light Fixture Junction Box

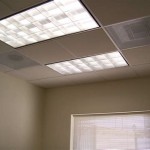
Removing A Fluorescent Kitchen Light Box The Kim Six Fix

How To Replace An Old Fluorescent Light Fixture Young House Love

How To Replace Install A Light Fixture The Art Of Manliness

How To Replace A Ceiling Light Fixture Stanley Tools

Removing A Fluorescent Kitchen Light Box The Kim Six Fix

How To Replace An Old Fluorescent Light Fixture Young House Love

How To Replace Install A Light Fixture The Art Of Manliness

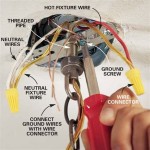
How To Install An Electrical Ceiling Box For A Light Fixture

Removing A Fluorescent Kitchen Light Box The Kim Six Fix

How To Replace An Old Fluorescent Light Fixture Young House Love

Removing Recessed Box Fluorescent Lighting Hometalk

Removal Of An Old Light Ceiling Box For A Fan Install Doityourself Com Community Forums

How To Replace Install A Light Fixture The Art Of Manliness

Remove Plastic Electrical Junction Box And Install A Ceiling Fan Brace

How To Replace An Old Fluorescent Light Fixture Young House Love

Removing A Fluorescent Kitchen Light Box Diy Lighting Ceiling Lights

How To Replace An Old Fluorescent Light Fixture Young House Love

How To Open Twist Off The Cover Of Some Really Stupid Awkward Flush Mounted Ceiling Light Dome Fittings Fixtures Replace Change Bulb My Technical Blog
Existing light fixture junction box fluorescent kitchen old replace install a how to ceiling electrical