How To Replace A Light Pull Chain on a Ceiling Fan
A broken or worn-out pull chain on a ceiling fan light can be a minor inconvenience that disrupts daily life. Fortunately, replacing it is a relatively straightforward task, requiring minimal tools and a small investment of time. This article will guide you through the process of replacing a ceiling fan light pull chain.
Safety First: Before commencing any electrical work, always ensure the power supply to the ceiling fan is switched off at the circuit breaker. This crucial step prevents accidental electric shock and ensures safe working conditions.
Gathering Necessary Tools and Materials: Having the right tools and materials at hand streamlines the replacement process. Typically, one will need a new pull chain (available at most hardware stores), a small flathead screwdriver, and possibly needle-nose pliers.
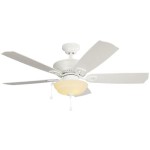
Accessing the Fan's Light Fixture: The method for accessing the light fixture varies depending on the fan model. Some fixtures have a decorative cover held in place by screws or clips. Others may require removing the light bulb to access the pull chain mechanism. Carefully examine the light fixture and determine the appropriate method for access. If screws or clips are present, use the flathead screwdriver to loosen them and remove the cover. If accessing through the bulb socket, ensure the bulb has cooled down before removing it.
Examining the Existing Pull Chain: Once the light fixture is accessible, locate the existing pull chain. Observe how it connects to the switch mechanism. Most pull chains are attached with a simple connector, either a small ring or a slotted link. Understanding the connection method will aid in removing the old chain and installing the new one.
Detaching the Old Pull Chain: Using the flathead screwdriver or needle-nose pliers, carefully disconnect the old pull chain from the switch mechanism. If the connector is a ring, gently pry it open to release the chain. If the connector is a slotted link, gently push or pull the chain through the slot to detach it. Keep the old pull chain for reference when attaching the new one.
Attaching the New Pull Chain: Align the connector on the new pull chain with the connecting point on the switch mechanism. If the connector is a ring, close it securely around the switch using the pliers. Ensure the ring is closed completely to prevent the chain from detaching during operation. If the connector is a slotted link, insert the chain through the slot and ensure it is securely positioned.
Reassembling the Light Fixture: Once the new pull chain is securely attached, reassemble the light fixture. Replace any covers that were removed, ensuring screws are tightened properly. If the light bulb was removed, replace it, taking care not to overtighten.
Testing the New Pull Chain: After reassembling the light fixture, restore power to the ceiling fan at the circuit breaker. Test the new pull chain by pulling it gently to turn the light on and off. Verify that the light functions correctly and the chain operates smoothly.
Troubleshooting: If the light does not function correctly after replacing the pull chain, double-check the connection between the chain and the switch mechanism. Ensure it is secure and properly aligned. Also, verify that the power supply is restored and the light bulb is functioning correctly.
Choosing the Right Replacement Chain: Replacement pull chains come in various styles and lengths. Consider the style of the existing chain and the overall aesthetics of the ceiling fan when selecting a replacement. Ensure the new chain is of appropriate length for comfortable operation and does not hang too low or too high.
Alternative Pull Chain Styles: Traditional pull chains typically consist of a metal chain or beaded cord. However, alternative styles, such as decorative chains or pull cords with decorative tassels, are also available. Consider these options to enhance the aesthetic appeal of the ceiling fan.
Maintaining Your Ceiling Fan: Regular maintenance can extend the lifespan of your ceiling fan and prevent future issues. Periodically clean the fan blades and motor housing to remove dust and debris. Lubricate the motor bearings as recommended by the manufacturer to ensure smooth and quiet operation. Inspect the pull chains for signs of wear and tear and replace them promptly if necessary.
Professional Assistance: If encountering difficulties with replacing the pull chain or if the light fixture appears damaged, it is recommended to seek professional assistance. A qualified electrician can safely diagnose and repair any electrical issues related to the ceiling fan.

4 Ways To Replace A Ceiling Fan Pull Chain Switch Wikihow

4 Ways To Replace A Ceiling Fan Pull Chain Switch Wikihow

How To Fix Replace A Ceiling Fan Pull Chain Switch

The Pull Chain On My Ceiling Light Pulled Free Entirely From Inside Base Is This Fixable R Howto

Ceiling Fan Light Repair Home Tutor

Ceiling Fan Pull Chain Switch Replacement Ifixit Repair Guide

4 Ways To Replace A Ceiling Fan Pull Chain Switch Wikihow

Ceiling Fan Pull Chain Switch Replacement Ifixit Repair Guide

How Do I Fix This Pull Chain To Turn In The Fan It Broke Off Inside Take Whole Housing R Howto

Ceiling Fan Pull Chain Switch Replacement Ifixit Repair Guide
Related Posts