Replace Ceiling Fixture With Ease: A Step-by-Step Guide
Transforming the ambiance of a room can be as simple as replacing a ceiling fixture. Whether you're upgrading an outdated fixture or adding a touch of style, this DIY project is accessible to even the most novice homeowners. Follow these comprehensive instructions to illuminate your space with a radiant glow.
Essential Tools and Materials:
- New ceiling fixture
- Screwdriver (Phillips and flathead)
- Wire strippers
- Electrical tape
- Safety glasses
- Ladder
Step 1: Safety First
Before commencing any electrical work, ensure your safety by turning off the power supply at the main breaker panel. Wear safety glasses to protect your eyes from any debris.
Step 2: Remove the Old Fixture
Use a screwdriver to loosen the screws holding the old fixture to the ceiling electrical box. Carefully detach the fixture and set it aside.
Step 3: Disconnect the Wires
Inspect the wires connected to the ceiling electrical box. Identify the black (hot), white (neutral), and bare ground wires. Loosen the terminal screws and carefully disconnect the wires from the old fixture.
Step 4: Prepare the New Fixture
Strip about half an inch of insulation from the ends of the wires on the new fixture. Ensure the bare wires are not touching each other.
Step 5: Connect the Wires
Insert the black wire from the new fixture into the black terminal screw on the ceiling electrical box. Tighten the screw with a screwdriver. Repeat this step for the white and bare ground wires, connecting them to their respective terminals on the electrical box.
Step 6: Wrap with Electrical Tape
Thoroughly wrap each wire connection with electrical tape to prevent short circuits. Make sure the tape covers the exposed wire and extends slightly onto the terminal screw.
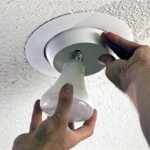
Step 7: Mount the New Fixture
Position the new fixture over the ceiling electrical box and align the mounting screws. Tighten the screws until the fixture is securely attached.
Step 8: Restore Power
Return to the main breaker panel and turn on the power supply. Test the new ceiling fixture to ensure it is functioning properly.
Tips for Success:
* If you encounter any difficulty, do not hesitate to contact a licensed electrician. * Use a non-contact voltage tester to verify that the power is turned off before handling any electrical components. * Be mindful that ceiling heights and fixture designs may vary. Adjust the ladder and fixture accordingly. * Once installed, ensure the fixture is securely attached to prevent it from falling or causing damage. * Consider matching the finish of the new fixture to the existing ceiling or décor.
How To Change A Light Fixture

How To Replace Install A Light Fixture The Art Of Manliness

How To Replace Led Ceiling Light Leng8021

How To Replace Install A Light Fixture The Art Of Manliness

How To Replace An Old Fluorescent Light Fixture Young House Love

Mounting Light Fixtures Fine Homebuilding

How To Replace A Ceiling Light Fixture Stanley Tools

How To Change A Light Fixture Easy Diy Guide Zillow Digs

How To Install A Lighting Fixture Forbes Home

How To Change Your Light Fixture In Seven Easy Steps A Pinch Of Joy
Related Posts