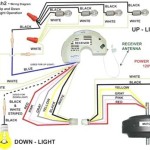
How to replace led ceiling light leng8021 easy ways an recessed bulb 13 steps install flat panel ox lighting remove and a on step by installation guide fixture with challenge of course az diy guy wafer lights vs can everything you should know commercial electric 11 in 12 5 watt dimmable white integrated edge lit round flush mount color changing 74210 hd the home depot

How To Replace Led Ceiling Light Leng8021

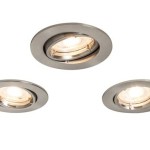
Easy Ways To Replace An Led Recessed Light Bulb 13 Steps

How To Install Led Flat Panel Light Ox Lighting

How To Remove And Replace A Recessed Led Ceiling Light

How To Install Led Flat Panel Light Ox Lighting

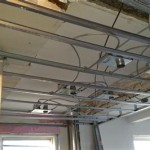
How To Install A Flat Panel Led Light On Ceiling

Led Flat Panel Light Step By Installation Guide

Flat Panel Led Light Fixture Install With A Challenge Of Course Az Diy Guy

Flat Panel Led Light Fixture Install With A Challenge Of Course Az Diy Guy

Wafer Lights Vs Can Everything You Should Know

Commercial Electric 11 In 12 5 Watt Dimmable White Integrated Led Edge Lit Round Flat Panel Flush Mount Ceiling Light Color Changing 74210 Hd The Home Depot

Led Panel 120x30 Dimmable Cologne De Energy Commerci

Leuchtendirekt Led Round Flat Panel Colour Temperature Changing Ceiling Light 15571 16 By Paul Neuhaus

9 Types Of False Ceiling Light Designs To Glam Up Your Home

Feit Electric 5 In 8 Watt Title 24 Dimmable White Integrated Led Round Flat Panel Ceiling Flush Mount With Color Change Cct 74202 Ca V2 The Home Depot

Dinglilighting Led Flush Mount Ceiling Light Fixture 18w 8 86 Modern Round Flat Lighting For Kitchen Closet Garage Hallway Com

Cost To Install Recessed Ceiling Lights In 2023 Forbes Home

Choosing The Best Led Recessed Lighting What You Should Know Blog

Lighting Led Ceiling Panel Light 1 Ft 24w 2160 2400lm 5000k Daylight Flat Backlit Fixture Direct Wire Flush Or Drop Install China Made In Com

Color Changing Crystal Edge Led Ceiling Light For Bathroom Bedroom And More Dimmable Flush Mount Fixture With Round Flat Panel Design Temu Bulgaria
How to replace led ceiling light an recessed bulb install flat panel on a step by fixture wafer lights vs can everything flush mount
Related Posts