Rewiring a Ceiling Light Socket: A Practical Guide
Ceiling light sockets, essential components of home lighting systems, can occasionally malfunction or become damaged. Rewiring a ceiling light socket is a relatively straightforward task that can be tackled with basic electrical knowledge and tools. This comprehensive guide will provide step-by-step instructions on how to successfully rewire a ceiling light socket, ensuring safe and effective operation.
Materials Required
- New ceiling light socket
- Electrical tape
- Wire nuts
- Screwdriver
- Electrical pliers
Safety Precautions
Before beginning any electrical work, it is crucial to prioritize safety. Turn off the electricity at the fuse box or circuit breaker and double-check using a voltage tester. Wear insulated gloves and work on a sturdy stepladder or platform.
Step-by-Step Rewiring Instructions
Step 1: Remove the Old SocketUsing a screwdriver, unscrew the bolts holding the socket to the ceiling box. Carefully detach the socket from the box, taking note of the wire connections.
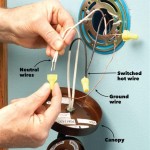
Step 2: Disconnect the WiresUsing electrical pliers, twist off the wire nuts connecting the wires to the socket. Separate the wires and ensure they do not touch each other.
Step 3: Strip the Wire EndsUsing wire strippers, strip approximately 1/2 inch of insulation from the ends of each wire. This will expose the bare copper wire.
Step 4: Attach Wires to the SocketConnect the black wire to the brass terminal on the socket. Connect the white wire to the silver terminal. Twist on wire nuts to secure the connections.
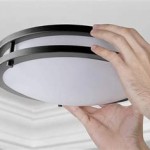
Step 5: Install the New SocketPlace the new socket into the ceiling box and align the screw holes. Screw in the bolts to secure the socket.
Step 6: Connect the Wires to the BoxConnect the ground wire (usually bare or green) to the green screw on the ceiling box. Connect the white wire to the white wire in the box and the black wire to the black wire.
Step 7: Test the SocketTurn the electricity back on and test the socket by turning on the light switch. If the light illuminates, the rewiring was successful.
Troubleshooting Tips
- If the light does not turn on, check the wire connections and ensure they are secure.
- If the socket sparks or smokes, turn off the electricity immediately and call a qualified electrician.
- If the socket becomes loose, tighten the bolts that secure it to the ceiling box.
Conclusion
Rewiring a ceiling light socket is an attainable task with appropriate safety precautions and basic electrical knowledge. Following these step-by-step instructions carefully will enable you to successfully rewire the socket and restore proper lighting to your space. Remember, if you encounter any difficulties or uncertainties, do not hesitate to consult a licensed electrician for assistance.

How To Install A Ceiling Light Fixture Diy Family Handyman

Adding Light How To Install A Fixture Diy

Mounting Light Fixtures Fine Homebuilding

Replacing A Ceiling Fan Light With Regular Fixture Jlc

How To Install A Light Fixture Diy Home Improvement
Replacing A Ceiling Fan Light With Regular Fixture Jlc

How To Install A Ceiling Light Fixture Diy Family Handyman

How To Replace A Ceiling Light Socket 13 Steps With Pictures

How To Install A Ceiling Light Fixture Diy Family Handyman

How To Replace Install A Light Fixture The Art Of Manliness
Related Posts


