How to Wire a Ceiling Fan with Light: One Wall Switch
Installing a ceiling fan with an attached light fixture is a practical solution for improving both airflow and illumination in any room. This comprehensive guide will provide step-by-step instructions on how to wire a ceiling fan with light using a single wall switch.
Materials Required:
- Ceiling fan with light fixture
- Electrical wire (black, white, red)
- Wire strippers
- Electrical tape
- Screwdriver
- Ceiling fan mounting bracket
- Ceiling fan canopy
- Light bulb for light fixture
Safety Precautions:
Before beginning any electrical work, it is crucial to ensure safety. Turn off the power at the breaker panel before proceeding. Wear safety glasses and gloves to protect yourself from any potential hazards.
Step 1: Mount the Ceiling Fan Bracket
Locate the ceiling joists and mark the center point. Attach the ceiling fan mounting bracket to the joists using screws.
Step 2: Connect the Electrical Wires
Identify the wires coming from the ceiling. Black is the live wire, white is the neutral wire, and green or bare copper is the ground wire. Connect the black wire from the ceiling to the black wire from the fan. Connect the white wire from the ceiling to the white wire from the fan. Twist the ground wires together and secure them with electrical tape.
Step 3: Wire the Fan and Light Fixture
Connect the red wire from the light fixture to the black wire from the fan. This will allow the light to be controlled by the same wall switch as the fan. Connect the white wire from the light fixture to the white wire from the fan. Secure all connections with electrical tape.
Step 4: Mount the Ceiling Fan Canopy
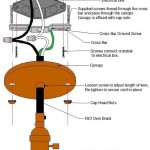
Lift the ceiling fan canopy onto the mounting bracket. Secure it in place using the provided screws.
Step 5: Install the Fan Blades and Light Fixture
Attach the fan blades to the fan motor according to the manufacturer's instructions. Install the light bulb into the light fixture.
Step 6: Connect the Wall Switch
Connect the black wire from the wall switch to the black wire from the ceiling. Connect the white wire from the wall switch to the white wire from the ceiling. Secure all connections with electrical tape.
Step 7: Turn on the Power and Test
Turn the power back on at the breaker panel and check if the fan and light are functioning properly. Adjust the fan speed and light brightness as desired.
Conclusion:
Wiring a ceiling fan with light using a single wall switch is a straightforward process that can be completed safely and efficiently. By following these step-by-step instructions, you can enjoy the benefits of improved airflow and illumination in your home.

Wiring A Ceiling Fan And Light With Diagrams Ptr
How To Wire A Ceiling Fan Light Switch Quora

Wiring A Ceiling Fan And Light With Diagrams Ptr

Wiring A Ceiling Fan And Light With Diagrams Ptr

How To Wire A Ceiling Fan Temecula Handyman

How To Wire A Ceiling Fan Control Using Dimmer Switch

Replacing A Ceiling Fan Light With Regular Fixture Jlc

How To Wire A Ceiling Fan Control Using Dimmer Switch
Replacing A Ceiling Fan Light With Regular Fixture Jlc

How To Wire A Ceiling Fan Control Using Dimmer Switch


