How To Wire A Ceiling Fan With Remote Two Switches
Installing a ceiling fan with remote and two switches can elevate the comfort and convenience of your indoor space. This comprehensive guide will provide you with a detailed walkthrough of the essential aspects of wiring a ceiling fan with a remote and two switches.
Before embarking on this project, it's crucial to ensure safety by turning off the main electrical supply to the room where you'll be working. Required Materials:
- Ceiling fan with remote control and receiver
- Two wall switches (one for fan, one for light)
- Electrical wire (14-gauge or 12-gauge)
- Wire nuts
- Electrical tape
- Screwdriver
- Drill
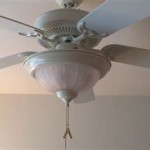
Step 1: Mount the Ceiling Fan
Secure the ceiling fan's mounting bracket to the ceiling electrical box using the provided screws. Ensure the bracket is level and aligned correctly.
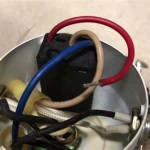
Step 2: Wire the Ceiling Fan Receiver
Locate the receiver that came with the ceiling fan. It usually has several wires: black (hot), white (neutral), blue (fan), and gray (light). Connect the black wire to the black wire from the ceiling electrical box, and the white wire to the white wire from the box. Twist the wires together tightly and secure them with a wire nut.
Step 3: Wire the Wall Switches
Install the two wall switches in their respective locations. One switch will control the fan, and the other will control the light. For the fan switch, connect the black wire from the switch to the blue wire from the ceiling fan receiver. For the light switch, connect the black wire from the switch to the gray wire from the receiver. Secure the connections with wire nuts.
Step 4: Connect the Remote Control
The remote control typically has two buttons, one for the fan and one for the light. Connect the fan button to the blue wire from the ceiling fan receiver and the light button to the gray wire from the receiver. Twist the wires together and secure them with wire nuts.
Step 5: Test the Installation
Restore power to the room and test the installation. The fan should operate using the remote control, and the light should be controlled using the wall switch. Ensure everything is functioning correctly before securing the switch plates and ceiling fan canopy.
Additional Tips:
When working with electrical wires, use caution and adhere to local electrical codes for safety.
Ensure all wire connections are secure and insulated to prevent electrical hazards.
If you encounter any difficulties or uncertainties, don't hesitate to consult a qualified electrician for assistance.

How To Install A Ceiling Fan Two Wall Switches What Bb Built

Ceiling Fan Wiring Diagram Two Switches

Wiring A Ceiling Fan And Light With Diagrams Ptr

How To Connect Wiring For Ceiling Fan With Remote Receiver Connection Two Switches Manual Only Shows Method Single Switch R Askanelectrician

Wiring A Ceiling Fan And Light With Diagrams Ptr

Help Needed On Going From Fan W Light With Two Switches To And Separate Lights Same R Askanelectrician

How Should I Connect The Wiring For Fans And Lights To Separate Control Switches Quora

Wiring A Ceiling Fan And Light With Diagrams Ptr

How To Wire A Ceiling Fan Control Using Dimmer Switch

3 Way Wiring Ceiling Fan With Remote For Two Wire Diy Home Improvement Forum
Related Posts