How To Wire A Ceiling Fan Without Wall Switch
Installing a ceiling fan without a wall switch can be a convenient and economical option, especially in areas where running new wires would be difficult or expensive. While it may seem like a daunting task, it is actually quite straightforward with the right tools and materials.
Materials You'll Need:
- Ceiling fan
- Ceiling fan mounting bracket
- Electrical wire (14-gauge or 12-gauge, depending on the amperage of the fan)
- Wire nuts
- Electrical tape
- Screwdriver
- Drill
- Voltage tester
Safety Precautions:
Before starting any electrical work, it is crucial to take the following safety precautions:
- Turn off the power to the circuit at the main electrical panel.
- Double-check that the power is off using a voltage tester.
- Wear safety glasses and gloves.
- Work on a stable ladder or platform.
Step-by-Step Instructions:
1. Mount the Bracket:
Secure the mounting bracket to the ceiling electrical box using the provided screws. Ensure that the bracket is level and firmly attached.
2. Connect the Wires:
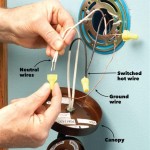
Refer to the wiring diagram provided with your ceiling fan. Connect the black wire from the fan to the black wire in the ceiling electrical box. Connect the white wire from the fan to the white wire in the box. Finally, connect the green or bare copper ground wire from the fan to the ground wire in the box. Twist the wires together and secure them with wire nuts.
3. Hang the Fan:
Carefully lift the fan onto the mounting bracket and secure it using the provided screws. Ensure that the fan is hanging securely and is level.
4. Install the Canopy:
The canopy covers the mounting bracket and conceals the electrical connections. Slide the canopy over the mounting bracket and secure it with the provided screws.
5. Install the Blades:
Attach the fan blades to the motor housing according to the manufacturer's instructions. Ensure that the blades are securely fastened and balanced.
6. Restore Power and Test:
Turn on the power at the main electrical panel. Use the pull chain or remote control (if included) to operate the fan. Check if the fan operates smoothly and at the desired speeds.
Tips:
- Use a voltage tester to ensure that the wires are connected correctly and there is no electricity flowing before touching any wires.
- Make sure that the electrical wire you use is the correct gauge for the amperage of the fan.
- If you are not comfortable working with electrical wiring, it is recommended to hire a qualified electrician.
- Properly grounding the fan is essential for safety. Ensure that the ground wire is securely connected.
- Balance the fan blades using a fan balancing kit to prevent wobbling or noise.
By following these steps and tips, you can successfully install a ceiling fan without a wall switch, providing convenient air circulation and a stylish addition to your room.

Wiring A Ceiling Fan And Light With Diagrams Ptr
How To Wire A Ceiling Fan Light Switch Quora

Wiring A Ceiling Fan Light Part 1

Wiring A Ceiling Fan And Light With Diagrams Ptr

Wiring A Ceiling Fan Light Part 1

How To Wire A Ceiling Fan For Separate Control Fo The And Light

How To Wire A Ceiling Fan Temecula Handyman
Replacing A Ceiling Fan Light With Regular Fixture Jlc

How To Wire A Ceiling Fan Control Using Dimmer Switch

Replacing A Ceiling Fan Light With Regular Fixture Jlc
Related Posts

