How to Wire a Ceiling Light
Swapping out an old ceiling light or installing a new one can be a relatively easy DIY project that can update the look of a room and improve its lighting. Here's a step-by-step guide on how to wire a ceiling light:
Tools and Materials:
* New ceiling light fixture * Screwdriver (Phillips and flathead) * Wire strippers * Electrical tape * Safety glassesSafety First:
* Turn off the power to the light fixture at the circuit breaker panel before starting any work. * Wear safety glasses to protect your eyes from debris.Step 1: Remove the Old Fixture:
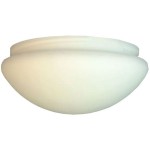
* Remove the screws holding the light fixture's glass or plastic cover in place. * Carefully detach the cover and set it aside. * Locate the screws holding the fixture's mounting bracket to the ceiling electrical box and remove them. * Gently pull the fixture away from the ceiling, being careful not to damage the wires.Step 2: Prepare the Wires:
* Identify the wires coming out of the electrical box. Typically, there will be a black wire (hot), a white wire (neutral), and a bare copper or green wire (ground). * Strip about 1/2 inch of insulation from the ends of the black, white, and ground wires. * Twist the exposed ends of the black wires together. * Twist the exposed ends of the white wires together. * Twist the exposed ends of the ground wires together.Step 3: Connect the Wires:
* Connect the twisted end of the black wire from the fixture to the twisted end of the black wires from the electrical box. Secure the connection with a wire nut. * Connect the twisted end of the white wire from the fixture to the twisted end of the white wires from the electrical box. Secure the connection with a wire nut. * Connect the twisted end of the ground wire from the fixture to the twisted end of the ground wires from the electrical box. Secure the connection with a wire nut.Step 4: Mount the Fixture:
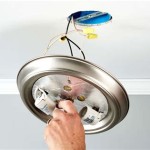
* Carefully lift the fixture up to the electrical box. * Align the mounting bracket with the electrical box and secure it with the screws. * Ensure that the fixture is securely attached to the ceiling.Step 5: Install the Light Cover:
* Place the light cover over the fixture and secure it with the screws. * Turn the power back on at the circuit breaker panel. * Test the light to ensure it's working properly.Tips:
* If there is no ground wire in the electrical box, you can use a green grounding screw that is included with the fixture. * Make sure all wire connections are tight and secure. * If you're not comfortable working with electricity, it's always best to consult a qualified electrician. * Always follow the manufacturer's instructions for proper installation and usage.
Wiring A Ceiling Fan And Light With Diagrams Ptr

Jim Lawrence Flush Lights Fitting Guide

Mounting Light Fixtures Fine Homebuilding

How To Install A Ceiling Light Fixture Diy Family Handyman

Replacing A Ceiling Fan Light With Regular Fixture Jlc

Inside The Circuit Pendant Lighting Light Switch Wiring Homeowner Faqs

How To Hang A Ceiling Light

How To Install A Ceiling Light Fixture Diy Family Handyman

How To Install Ceiling Light Fixtures Ehow

How To Install A Ceiling Light Fixture Diy Family Handyman
Related Posts