How To Wire A Light Ceiling Rose
A ceiling rose is a decorative fitting that conceals the electrical connections for a light fixture. It is typically made of metal or plastic and is attached to the ceiling. The light fixture is then attached to the ceiling rose. Wiring a ceiling rose is a relatively simple task that can be completed in a few steps.
Tools and Materials
- Ceiling rose
- Light fixture
- Wire strippers
- Screwdriver
- Electrical tape
Step 1: Turn Off the Power
Before you begin working on the ceiling rose, it is important to turn off the power to the circuit. This can be done by flipping the circuit breaker or removing the fuse.
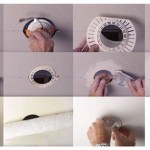
Step 2: Remove the Old Ceiling Rose
If there is an existing ceiling rose, it will need to be removed. To do this, simply unscrew the screws that are holding it in place. Be careful not to damage the wires.
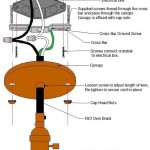
Step 3: Connect the Wires
The ceiling rose will have three terminals: live (L), neutral (N), and earth (E). The live wire is usually red, the neutral wire is usually black, and the earth wire is usually green or yellow. Connect the wires from the light fixture to the corresponding terminals on the ceiling rose. Use wire strippers to remove about 1/2 inch of insulation from the ends of the wires before connecting them.
Step 4: Secure the Wires
Once the wires are connected, they need to be secured. This can be done by wrapping electrical tape around the connections.
Step 5: Attach the Ceiling Rose
Now that the wires are connected and secured, the ceiling rose can be attached to the ceiling. Simply screw the screws back into place.
Step 6: Attach the Light Fixture
The final step is to attach the light fixture to the ceiling rose. To do this, simply screw the light fixture into place.
Step 7: Turn On the Power
Once the light fixture is attached, you can turn the power back on. The light fixture should now be working properly.
Tips
- If you are not comfortable working with electricity, it is best to hire a qualified electrician to wire the ceiling rose.
- Make sure that the ceiling rose is properly secured before attaching the light fixture.
- Use a light bulb with the correct wattage for the light fixture.

How To Wire A Ceiling Rose Wiki Fandom

Ceiling Rose Wiring Diagrams Harmonised Colours Light Fitting

Ceiling Rose Wiring Diagrams Harmonised Colours Light Fitting

Extending A Lighting Circuit Step By Guide And

How To Wire A Ceiling Rose Wiki Fandom

How To Replace A Ceiling Rose

Inside The Circuit Pendant Lighting Light Switch Wiring Homeowner Faqs

Ceiling Rose Wiring Diynot Forums

Extending A Lighting Circuit Step By Guide And

Top Tip Replacing A Ceiling Rose And Pendant Light R Diy