Hunter Ceiling Fan Light Fixture Replacement Guide
Hunter ceiling fans are popular for their durability, energy efficiency, and stylish designs. If you have a Hunter ceiling fan with a light fixture that needs to be replaced, following these simple steps can help you complete the task safely and efficiently.
Safety Precautions
Before starting, ensure the power to the fan is turned off at the circuit breaker or fuse box. Also, wear gloves to protect your hands from any sharp edges.
Step 1: Remove the Fan Blades
Securely hold each blade and carefully loosen the screws that attach them to the fan motor. Gently pull the blades straight down to remove them.
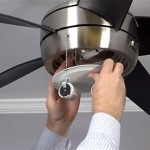
Step 2: Disconnect Wiring
Locate the canopy, which is the round cover that connects the fan to the ceiling. Remove the screws to detach it. Carefully pull down the fan motor and disconnect the wires connected to the light fixture. Note the wire colors for reconnection later.
Step 3: Remove the Old Light Fixture
Unscrew the nuts or bolts that hold the light fixture in place. Gently pull the fixture straight down to detach it from the fan motor.
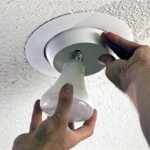
Step 4: Install the New Light Fixture
Align the new light fixture with the fan motor and carefully screw it into place. Reconnect the wires, matching the colors as noted in step 2.
Step 5: Reassemble the Fan
Reinstall the canopy and secure it with screws. Lift the fan motor and reconnect it to the ceiling bracket. Replace the fan blades and tighten the screws.
Step 6: Restore Power and Test
Turn the power back on at the circuit breaker or fuse box. Check that the light fixture is working correctly and that the fan is operating smoothly.
Tips for Choosing a New Light Fixture
When selecting a replacement light fixture for your Hunter ceiling fan, consider these factors:
- Light source: Choose LEDs or CFLs for energy efficiency.
- Wattage: Refer to the fan's manual for the maximum wattage rating.
- Style: Match the light fixture's design to your room's décor.
- Size: Ensure the fixture is the appropriate size for your fan.
- Dimming capabilities: If desired, select a light fixture that can be dimmed.
Replacing a light fixture on a Hunter ceiling fan is a straightforward task that can be completed with basic tools and safety precautions. By following these steps and considering the tips provided, you can update the look of your fan and enjoy its functionality for years to come.

4 Ways To Replace A Light Bulb In Ceiling Fan Wikihow

Hunterexpress Easy Installation Ceiling Fan Hunter

How To Replace A Light Fixture With Ceiling Fan Projects By Peter

Hunter Fan Announces Hunterexpress Technology

Hunter Original 4 Light Matte Black Ceiling Fan Shades Led Kit 99386 The Home Depot

Hunter Ceiling Fan Replacement Parts Hampton Bay Fans Lighting

Hunter Avia Ii Led 52 Ceiling Fan Costco

Hunter Kenbridge 52 In Led Low Profile Indoor Brushed Nickel Ceiling Fan With Light Kit 53380 The Home Depot

Hunter 14 5 In 3 Light Cased White Led Ceiling Fan Kit The Parts Department At Com

Hunter 52 Studio Series New Broe Ceiling Fan With Light Kit And Pull Chain Com
Related Posts