Hunter Ceiling Fan Installation: A Comprehensive Guide
Installing a Hunter ceiling fan can enhance airflow, improve comfort, and add a touch of style to your home. Follow these step-by-step instructions to ensure a safe and successful installation:
1. Preparation
Gather necessary tools (Phillips screwdriver, wire strippers, electrical tape) and materials (mounting bracket, fan blades, canopy).
Turn off the circuit breaker and verify the power is off using a voltage tester.
Select the installation location. Ensure there is adequate clearance (18-24 inches) from walls and light fixtures.
2. Mount the Bracket
Attach the mounting bracket to the electrical box using the provided screws. Securely tighten the screws.
Connect the wires from the ceiling to the fan wires using wire nuts. Match wire colors (black to black, white to white, green to bare copper).
Push the wires into the electrical box and pull the fan wires through the opening in the bracket.
3. Hang the Fan
Lift the fan canopy (cover) and place it over the mounting bracket. Rotate the canopy to align the screws with the bracket slots.
Insert the screws through the canopy and tighten them into the bracket. Do not overtighten.
Hook the provided security cable onto the safety hook on the motor housing or ceiling.
4. Attach the Blades
Attach the fan blades by sliding them into the blade arms. Use the provided hex key or screwdriver to secure the blades with screws.
Tighten the screws evenly to ensure balance.
Check the fan's balance by gently shaking it. If it's unbalanced, adjust the blade angle by loosening the screws and slightly moving the blade.
5. Install the Canopy and Light Fixture (if applicable)
Slide the canopy up to cover the mounting bracket. Secure it using the provided screws.
If installing a light fixture, follow the manufacturer's instructions to connect the fixture and shade.
Turn on the power and test the fan's operation and speed settings.
6. Safety Considerations
Ensure the fan blades are properly aligned and secured to prevent any wobbling or vibration.
Make sure the security cable is attached to a sturdy support to prevent the fan from falling.
Regularly inspect the fan's electrical components and make necessary repairs or replacements.
7. Additional Tips
For ceiling heights over 10 feet, consider using an optional downrod to lower the fan for better airflow.
To improve energy efficiency, use LED light bulbs in the light fixture.
For outdoor fans, install them in a sheltered area to protect them from weather elements.
Installation Instructions For Hunter Ceiling Fan
Hunter Fans How To Install Your Ceiling Fan Cpo S
Hunterexpress Easy Installation Ceiling Fan Hunter
Installation Instructions For Hunter Original Ceiling Fans Fan
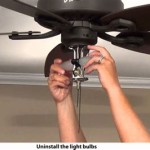
Construction Codes Of Ontario
Hunter Ceiling Fan Owner S Manual Manualslib
Hunter Fans How To Install Your Ceiling Fan Cpo S
Hunter 51884 Gravity Ceiling Fan Installation Guide
Hunter Alexander 44 Inch Indoor Flush Mount Ceiling Fan Installation Guide
How To Install A Ceiling Fan Hunter
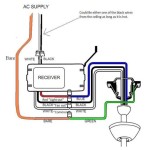
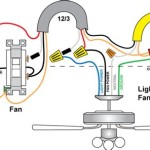
Related Posts