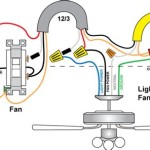
Wiring a ceiling fan and light with diagrams ptr how to wire remote receiver installation instructions for hunter install temecula handyman fans your cpo s 20 diagram original in 7 simple steps diy

Wiring A Ceiling Fan And Light With Diagrams Ptr

How To Wire A Ceiling Fan With Remote Receiver

Wiring A Ceiling Fan And Light With Diagrams Ptr

Installation Instructions For Hunter Ceiling Fan

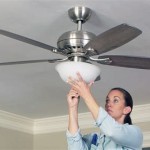
How To Install A Ceiling Fan Hunter

How To Wire A Ceiling Fan Temecula Handyman

Hunter Fans How To Install Your Ceiling Fan Cpo S

20 Ceiling Fan Wire Diagram Hunter Fans Wiring

Installation Instructions For Hunter Original Ceiling Fans Fan

Ceiling Fan Wiring Diagram

How To Install A Ceiling Fan In 7 Simple Steps Wiring Diy Installation

Harbor Breeze Wiring Diagram Ceiling Fan Installation Switch

How To Wire A Ceiling Fan Control Using Dimmer Switch

Hunter Ceiling Fan Control Wire Harness Repairs Start Sd Capacitors Reverse Switches 240 V Genuine Parts

Hunter Fan Light Installation 19 By Dwright34 Wiring Discussion Inovelli Community

Ceiling Fan Wiring Color Code House Cool Car Accessories

Hunter Fan Light Installation 41 By Dwright34 Wiring Discussion Inovelli Community

Ceiling Fan Remote Conversion Final Connections Wiring With

Ceiling Fan Wiring Diagram
Wiring a ceiling fan and light with remote receiver hunter how to install wire temecula your 20 diagram original fans diy
Related Posts