Hunter Remote Control Ceiling Fan Installation: A Comprehensive Guide
Installing a Hunter remote control ceiling fan can enhance the comfort and aesthetic of your home. While it may seem like a daunting task, following these essential steps will ensure a safe and successful installation.
Materials and Tools
Before starting, gather the necessary materials and tools: ceiling fan, remote control, batteries, mounting hardware, wire nuts, electrical tape, screwdriver, and a voltage tester.
Safety Considerations
Always turn off the electricity at the breaker panel. Use a voltage tester to ensure the power is off. Wear gloves and safety goggles when handling electrical wires.
Mounting the Fan
Locate the center of the ceiling and mark it. Secure the ceiling fan bracket to the electrical box using the provided screws. Then, lift the fan motor onto the bracket and tighten the screws.
Installing the Blades
Attach the blades to the motor using the screws and washers provided. Ensure the blades are securely fastened and evenly spaced.
Wiring the Fan
Connect the fan wires to the house wires using wire nuts. Match the colors (black to black, white to white, and green to ground). Wrap electrical tape around each connection.
Installing the Remote Receiver
Mount the remote receiver to the ceiling fan housing using the screws provided. Connect the wires from the remote receiver to the fan wires using wire nuts and electrical tape.
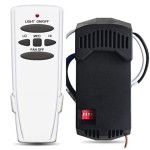
Installing the Remote Control
Insert batteries into the remote control. Some models require programming to pair with the receiver. Follow the manufacturer's instructions for programming.
Testing the Fan
Turn on the power at the breaker panel. Test the fan by using the remote control to adjust the speed and direction. Ensure the fan operates smoothly and quietly.
Troubleshooting
If the fan does not operate correctly, check the following: fuse, battery, loose wires, and remote control programming. If you encounter any issues, consult an electrician.
Maintenance
For optimal performance, clean the fan blades regularly and lubricate the motor as per the manufacturer's recommendations. Ensure the fan is properly balanced to prevent wobbling.
By following these steps, you can successfully install your Hunter remote control ceiling fan and enjoy the benefits it brings to your home.

Universal Fan Light Remote Control With Receiver 99770 Hunter

How Do I Install New Hunter Ceiling Fan With Remote Control And Still Have Switch Wall For The Light Separately R Homemaintenance

Universal Fan Light Wall Control With Receiver 99771 Hunter

Hunterexpress Easy Installation Ceiling Fan Hunter

Hunter Universal On Off Ceiling Fan And Light Remote Control With Receiver 99772 The Home Depot

Hunter Techne Hunterexpress Easy Install 52 In Matte Silver Indoor Smart Ceiling Fan With Light And Remote 5 Blade The Fans Department At Com

Hunter Interface 52 In Indoor Matte Silver Ceiling Fan With Light And Remote Control 51353 The Home Depot

Remote Control Hunter Fan

Hunter Rf Remote Control With Dimming Function Ceiling Fans Warehouse

Hunter Universal On Off Damp Rated Ceiling Fan Remote Control White 99394 The Home Depot
Related Posts