Essential Aspects of Installing Wiring for Ceiling Light
Upgrading or replacing a ceiling light fixture requires careful planning and execution. One crucial aspect of this process is ensuring the safe and proper installation of electrical wiring. Here are some essential aspects to consider when installing wiring for a ceiling light:
Safety First
Electrical work can be hazardous, so it's paramount to prioritize safety. Always turn off the power at the circuit breaker before working on any electrical components. Use insulated tools and wear appropriate safety gear, such as gloves and safety glasses.
Gather Necessary Materials
Before starting, ensure you have all the necessary materials, including:
- Electrical wiring (typically 14-gauge or 12-gauge depending on fixture specifications)
- Junction box for connecting wires
- Electrical tape
- Wire strippers
- Electrical pliers
Identify Circuit and Junction Box
Determine which circuit the new light will be connected to. Locate the nearest junction box in the ceiling or wall and ensure it has enough capacity for the additional wires.
Run Wiring from Circuit Breaker
Pull the new wiring from the circuit breaker through the attic or crawl space to the junction box near the ceiling light's desired location. Use cable clamps or staples to secure the wiring to support beams or joists.
Connect Wires in Junction Box
Strip the insulation off the ends of the new wires by about half an inch. Connect the white neutral wire to the white neutral wire from the existing circuit. Do the same for the black hot wire and the red or blue switch wire, if applicable.
Grounding and Insulation
Ensure proper grounding by connecting the bare copper ground wire to the green ground screw on the junction box. Wrap all connections securely with electrical tape to prevent short circuits.
Secure to Junction Box
Mount the junction box to the ceiling joist or stud using the provided screws. Ensure the junction box is level and securely fastened before pulling the wires through the electrical knockout.
Connect Fixture to Wires
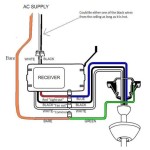
Connect the wires from the ceiling to the corresponding wires on the light fixture's mounting bracket. Follow the manufacturer's instructions for proper wiring and secure the connections with wire nuts.
Mount Fixture to Ceiling
Lift the light fixture into place and align it with the mounting bracket. Secure the fixture with the provided screws or bolts. Turn on the power and test the light to ensure it is working properly.
Additional Tips
- Always consult a qualified electrician if you are unsure of any aspect of the installation.
- Use the correct wire gauge for the fixture's wattage.
- Ensure all connections are tight and secure.
- If you are installing a dimmer switch, follow the manufacturer's instructions carefully.
- Inspect wiring regularly for any damage or wear and tear.

Replacing A Ceiling Fan Light With Regular Fixture Jlc

How To Install A Ceiling Light Fixture Diy Family Handyman

Mounting Light Fixtures Fine Homebuilding

Wiring A Ceiling Fan And Light With Diagrams Ptr

How To Install A Ceiling Light Fixture Diy Family Handyman

Jim Lawrence Flush Lights Fitting Guide

How To Install A Ceiling Light Fixture Diy Family Handyman
Replacing A Ceiling Fan Light With Regular Fixture Jlc

Inside The Circuit Pendant Lighting Light Switch Wiring Homeowner Faqs

How To Install Ceiling Light Fixtures Ehow
Related Posts

