Essential Aspects of Installing Ceiling Fan Wires
Installing a ceiling fan can be a relatively straightforward task, but it's important to approach the wiring aspect with caution and precision. This article will delve into the essential aspects of installing ceiling fan wires, ensuring a safe and successful installation.
Understand the Wiring Diagram
Before beginning any wiring work, it's crucial to thoroughly understand the wiring diagram provided with the ceiling fan. This diagram will indicate the correct connections for each wire based on the fan's design and the electrical system in your home. Pay attention to the color coding of the wires and ensure you have the proper tools and materials.
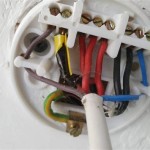
Identify the House Wires
Once you've understood the wiring diagram, locate the house wires in the ceiling box. Typically, there will be two black wires (hot), a white wire (neutral), and a bare copper or green wire (ground). Use a voltage tester to confirm the identity of each wire.
Connect the Ground Wire
The ground wire, typically bare copper or green, serves as a safety measure to protect against electrical shocks. Connect the ground wire from the fan to the ground wire in the ceiling box using a wire nut. Ensure the connection is tight and secure.
Connect the Black and White Wires
The black wires from the fan (hot) connect to the black wires in the ceiling box. Similarly, the white wires from the fan (neutral) connect to the white wires in the ceiling box. Use wire nuts to secure the connections and ensure proper polarity.
Connect the Capacitor Wires
Some ceiling fans may have capacitors, which aid in starting and maintaining fan speed. The capacitor wires typically come in blue and yellow or red and yellow. Follow the wiring diagram to connect them to the corresponding terminals on the fan.
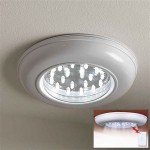
Install the Ceiling Fan
Once all the wires are connected securely, mount the ceiling fan to the ceiling box according to the manufacturer's instructions. Ensure the fan is securely fastened and level.
Test the Fan
After completing the wiring and installation, turn on the fan's power at the breaker panel. Test the fan by operating it at different speeds and observing if it runs smoothly without any unusual noises or vibrations.
Safety Precautions
When working with electrical wiring, always prioritize safety. Follow these precautions:
- Turn off the power at the breaker panel before beginning any work.
- Use appropriate protective gear, including gloves and safety glasses.
- Be aware of your surroundings and avoid contact with live wires.
- If you're not comfortable working with electrical systems, consult a qualified electrician.
Conclusion
Installing ceiling fan wires requires a methodical approach, proper understanding of the wiring diagram, and adherence to safety guidelines. By following these essential aspects, you can successfully install your ceiling fan, enhancing comfort and airflow in your home.

Wiring A Ceiling Fan And Light With Diagrams Ptr

How To Wire A Ceiling Fan Temecula Handyman

Wiring A Ceiling Fan And Light With Diagrams Ptr

Wiring A Ceiling Fan And Light With Diagrams Ptr

Wiring A Ceiling Fan And Light With Diagrams Ptr

How To Wire A Ceiling Fan Temecula Handyman

How To Wire A Ceiling Fan Control Using Dimmer Switch

Installing A Ceiling Fan Fine Homebuilding

Ceiling Fan Wiring Diagram

Wiring A Ceiling Fan And Light With Diagrams Ptr
Related Posts