Essential Aspects of Installing Can Lights In An Existing Ceiling
Installing can lights in an existing ceiling is a common home improvement project that can add style and functionality to any room. However, there are several essential aspects to consider before beginning the installation process.
Identifying The Part of Speech of the Keyword: The keyword "Installing Can Lights In An Existing Ceiling" is a verb phrase that describes the action of placing can lights into an existing ceiling. Understanding the part of speech of the keyword helps us to focus on the essential aspects of the topic, such as the preparation, tools, techniques, safety measures, and troubleshooting involved in the installation process.
This article will explore these essential aspects in detail, providing guidance on how to successfully install can lights in an existing ceiling. By considering these aspects, homeowners can ensure a safe and effective installation that will enhance the aesthetics and functionality of their homes.
The following are some of the essential aspects to consider when installing can lights in an existing ceiling:
1. Planning and Preparation
Before beginning the installation process, it is important to plan the layout of the can lights and gather the necessary tools and materials.
This includes determining the spacing and placement of the lights, as well as identifying any electrical wiring or obstacles that may need to be addressed.
Additionally, it is important to gather all of the necessary tools, such as a drill, a hole saw, a screwdriver, and a voltage tester.
2. Electrical Safety
When working with electricity, it is important to take the necessary safety precautions.
This includes turning off the power to the circuit that you will be working on and ensuring that all wires are properly insulated.
It is also important to wear gloves and safety glasses when working with electrical components.
3. Cutting the Holes
Once the planning and safety precautions have been taken, you can begin cutting the holes for the can lights.
To do this, you will need to use a hole saw that is the same size as the diameter of the can lights.
When cutting the holes, be sure to keep the drill steady and level to ensure that the holes are clean and precise.
4. Installing the Can Lights
Once the holes have been cut, you can begin installing the can lights.
To do this, you will need to insert the can light into the hole and twist it until it is secure.
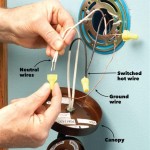
Once the can light is secure, you can connect the electrical wires and install the trim.
5. Troubleshooting
If you encounter any problems during the installation process, there are several troubleshooting steps that you can take.
This includes checking the electrical connections, ensuring that the can lights are properly grounded, and inspecting the bulbs for any damage.
If you are unable to resolve the problem, it is best to contact a qualified electrician for assistance.
By following these essential aspects, you can successfully install can lights in an existing ceiling and enjoy the added style and functionality that they provide.

How To Install Recessed Lighting Fixthisbuildthat

8 Recessed Lighting Installation Tips For Diyers Bob Vila

Installing Recessed Lighting Fine Homebuilding

How To Install Recessed Lights In An Existing Ceiling Lamphq

Recessed Lighting In A Inium Kitchen

How To Wire Recessed Lighting Tabletop Walk Through

Energy Star Ask The Experts S

How To Install Ceiling Light Homeserve Usa

How To Install Recessed Lighting Fixthisbuildthat

How To Install New Work Recessed Lighting
Related Posts