Essential Aspects of Installing a Hunter Ceiling Fan Light Kit
Installing a Hunter ceiling fan light kit is a task that requires careful consideration and attention to detail. To ensure a successful and safe installation, it's crucial to follow the provided instructions thoroughly. This article delves into the essential aspects of the installation process to guide you through each step.
1. Safety Precautions
Before commencing the installation, it's imperative to prioritize safety. Turn off the power supply to the ceiling from the circuit breaker or fuse box. Verify that there is no electrical current using a voltage tester. Always wear safety glasses and gloves to protect yourself during the process.
2. Gathering Tools and Materials
Ensure you have all the necessary tools and materials before starting. This includes a screwdriver, wire cutters, electrical tape, and the Hunter ceiling fan light kit. Double-check the kit contents to ensure it includes all the required parts, such as the light assembly, bulbs, and mounting hardware.
3. Installing the Light Assembly
Begin by attaching the light assembly to the ceiling fan motor housing. Refer to the instructions for specific guidance on how to secure the assembly correctly. Make sure the electrical connections between the light assembly and the fan are secure and properly insulated with electrical tape.
4. Installing the Bulbs
Insert the bulbs into the light assembly. Use caution not to overtighten the bulbs, as this can damage them. Refer to the light kit's manual for recommended bulb types and wattage limits to ensure compatibility with the fixture.
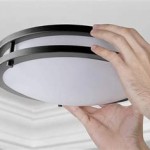
5. Installing the Glass or Shade
Depending on the model of your Hunter ceiling fan light kit, it may include a glass or shade. Carefully position the glass or shade over the light assembly and secure it according to the manufacturer's instructions. Ensure that it is securely fastened to prevent accidental dislodgement.
6. Electrical Connections
Connect the wires from the light assembly to the wires in the ceiling fan's wiring harness. Match the colors of the wires (black to black, white to white, and green or bare copper to ground) and secure the connections with wire nuts. Wrap electrical tape around each connection for added insulation.
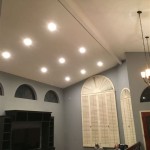
7. Testing and Finishing
Turn on the power supply at the circuit breaker or fuse box. Test the light kit to ensure it's functioning correctly. If the light does not turn on, check the connections and ensure that the bulbs are secured. Finally, tidy up any excess wire or materials and enjoy the enhanced illumination provided by your newly installed Hunter ceiling fan light kit.

Installation Instructions For Hunter Ceiling Fan

How To Install A Ceiling Fan Hunter

Wiring A Ceiling Fan And Light With Diagrams Ptr

Hunter Fans How To Install Your Ceiling Fan Cpo S

Hunterexpress Easy Installation Ceiling Fan Hunter

How To Install A Ceiling Fan Hunter

Hunterexpress Easy Installation Ceiling Fan Hunter

Hunter Georgetown 52 In Integrated Led Indoor Matte Silver Ceiling Fan With Light Kit And Remote Included 51878 The Home Depot

Changing Ceiling Fan Light Kit Doityourself Com Community Forums

Hunter Newsome 52 In Indoor Premier Broe Bowl Light Kit Ceiling Fan 53311 The Home Depot
Related Posts