Installing Pot Lights in an Existing Ceiling: A Comprehensive Guide
Pot lights, also known as recessed lighting, are a popular and versatile choice for illuminating any room in your home. They offer a modern, sleek look and can be used to create a variety of lighting effects. If you're considering installing pot lights in your existing ceiling, here's a comprehensive guide that will take you through every step of the process.
Before You Start
Before you begin, it's important to gather the necessary tools and materials. You'll need:
- Pot lights (the number will depend on the size of your room and the desired lighting level)
- Electrical wire (14-gauge or 12-gauge)
- Electrical connectors (wire nuts)
- Insulation piercing connectors
- Drywall saw or hole cutter
- Stud finder
- Drill
- Screwdriver
- Caulk gun
- Caulk
Once you have everything you need, it's time to start the installation process.
Step 1: Plan the Layout
The first step is to plan the layout of your pot lights. Consider the size of the room, the desired lighting level, and the location of any furniture or fixtures that might block the light. Once you have a plan, mark the locations of the pot lights on the ceiling.
Step 2: Cut the Holes
Next, it's time to cut the holes for the pot lights. Use a drywall saw or hole cutter to cut circular holes that are slightly larger than the diameter of the pot lights. Be careful not to cut into any electrical wires or studs.
Step 3: Run the Electrical Wire
Now it's time to run the electrical wire from the electrical box to each pot light location. Use a stud finder to locate the studs in the ceiling and run the wire along the studs. Secure the wire with insulation piercing connectors.
Step 4: Connect the Pot Lights
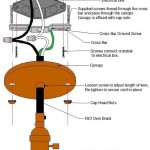
Once the electrical wire is in place, you can start connecting the pot lights. Connect the black wire from the pot light to the black wire in the electrical box, the white wire to the white wire, and the ground wire to the green or bare copper wire. Use wire nuts to secure the connections.
Step 5: Install the Pot Lights
Now it's time to install the pot lights. Insert the pot light into the hole and twist it clockwise to secure it in place. Repeat this process for each pot light.
Step 6: Finish the Installation
Once the pot lights are installed, you can finish the installation by caulking around the edges of each pot light. This will help to seal out air leaks and prevent drafts. Allow the caulk to dry completely before turning on the pot lights.
Enjoy Your New Lighting
Congratulations! You've now successfully installed pot lights in your existing ceiling. Enjoy the new, modern look and the improved lighting in your home.

How To Install Recessed Lighting Fixthisbuildthat

8 Recessed Lighting Installation Tips For Diyers Bob Vila

How To Install Recessed Lighting Like A Pro Our Home Made Easy

Installing Recessed Lighting Fine Homebuilding

How To Wire Recessed Lighting Tabletop Walk Through

How To Install Recessed Lighting Fixthisbuildthat

How To Install New Work Recessed Lighting

Recessed Lighting Installation Bob Vila

How Much Does It Cost To Install Recessed Lighting In 2024

How To Install Recessed Lighting Fixthisbuildthat
Related Posts