Recessed lighting on vaulted ceilings or sloped are a refined and cla ceiling living room installing can you put lights into alternatives jdm electrical contractors guide of placement recessedlightspro how to install led high 200 diy project 10 best fixtures halo 6 in white with trim baffle 456w the home depot use insulated

Recessed Lighting On Vaulted Ceilings Or Sloped Are A Refined And Cla Ceiling Living Room Installing

Can You Put Recessed Lights Into A Vaulted Ceiling Alternatives

Sloped Ceiling Recessed Lighting Jdm Electrical Contractors

Can You Put Recessed Lights Into A Vaulted Ceiling Alternatives

A Guide Of Vaulted Ceiling Recessed Lighting Placement Recessedlightspro

How To Install Led Recessed Lighting On High Ceiling A 200 Diy Project

10 Best Sloped Ceiling Recessed Lighting Fixtures Vaulted

A Guide Of Vaulted Ceiling Recessed Lighting Placement Recessedlightspro

A Guide Of Vaulted Ceiling Recessed Lighting Placement Recessedlightspro

Halo 6 In White Recessed Lighting With Sloped Ceiling Trim Baffle 456w The Home Depot

How To Use Insulated Can Lights In Ceilings Diy

Can You Put Recessed Lights Into A Vaulted Ceiling Alternatives

Halo 6 In White Recessed Lighting With Sloped Ceiling Trim Baffle 456w The Home Depot

Sloped Ceiling Recessed Lights Really Necessary For Ceilings R Homeimprovement

Halo 6 In White Recessed Lighting With Sloped Ceiling Trim Baffle 456w The Home Depot

Can You Put Recessed Lights Into A Vaulted Ceiling Alternatives

Morris Recessed Lighting For Sloped Ceilings Lektron

The 101 On Recessed Lighting Part 2 Lightology

Recessed Lighting In Kitchen On Cathedral Ceiling Gimbals Vs Regular

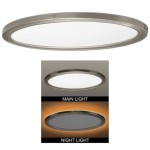
Halo 6 In Selectable Cct 2700k To 5000k Integrated Led White Recessed Light Sloped Ceiling Trim Direct Mount Module Rls6159fs1ewhdmr The Home Depot
Recessed lighting on vaulted ceilings can you put lights into a sloped ceiling jdm guide of how to install led halo 6 in white with insulated