Insulation Around Ceiling Light Fixtures

By | August 13, 2018

Essential Aspects of Insulation Around Ceiling Light Fixtures

Ensuring proper insulation around ceiling light fixtures is crucial for electrical safety and energy efficiency in your home. By understanding the importance of insulation and following best practices, you can effectively minimize fire hazards, reduce heat loss, and enhance the overall performance of your lighting system.

Importance of Insulation

Proper insulation prevents heat from escaping through gaps around ceiling light fixtures, which can lead to several issues:

  • Fire hazard: Excessive heat can ignite combustible materials in the attic or ceiling, posing a significant fire risk.
  • Energy inefficiency: Heat loss through uninsulated fixtures increases your energy consumption, leading to higher utility bills.
  • Moisture problems: Moisture can accumulate in poorly insulated areas, causing mold and mildew growth, damaging the fixture and surrounding materials.
  • Best Practices for Insulation

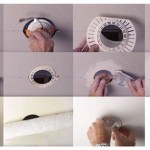
    To ensure optimal insulation, follow these best practices:

  • Use non-combustible materials: Choose insulation made of materials like fiberglass or cellulose, which are fire-resistant and won't contribute to a fire hazard.
  • Seal gaps and holes: Thoroughly seal any gaps or holes around the fixture using caulk or spray foam to prevent heat and moisture from escaping.
  • Follow fixture manufacturer's guidelines: Refer to the manufacturer's instructions for specific insulation recommendations and clearances to ensure compatibility with the fixture.
  • Avoid blocking airflow: Ensure that insulation does not obstruct airflow around recessed fixtures, as it can cause overheating and potential fire hazards.
  • Warning Signs of Insufficient Insulation

    Insufficient insulation around ceiling light fixtures can manifest in several ways:

  • Discolored or scorched insulation: Heat escaping through gaps can discolor or scorch the surrounding insulation, indicating a fire hazard.
  • Warmth or drafts around the fixture: If you feel warmth or drafts around the fixture, it suggests insufficient insulation and heat loss.
  • Moisture accumulation: Condensation and moisture buildup in the attic or ceiling near the fixture are signs of poor insulation.
  • Conclusion

    Proper insulation around ceiling light fixtures is essential for electrical safety, energy efficiency, and the longevity of your lighting system. By adhering to best practices, you can minimize fire hazards, reduce heat loss, and ensure optimal performance of your ceiling lights. If you have concerns about the insulation around your light fixtures, consult with a qualified electrician for a professional assessment and necessary repairs.


    A Never Worry Again Insulated Ceiling

    A Never Worry Again Insulated Ceiling Jlc

    Recessed Lights Covered With Insulation

    Recessed Lights Covered With Insulation Electrical Inspections Internachi Forum

    Downlights And Recessed Lights

    Downlights And Recessed Lights Smarter Homes

    Pacific Insulation Supply

    How To Insulate Your Attic Pacific Insulation Supply

    How To Seal Recessed Light Fixtures For

    How To Seal Recessed Light Fixtures For Energy Efficiency Today S Homeowner

    Inspecting Added Blown Insulation In An

    Inspecting Added Blown Insulation In An Existing Vented Attic Internachi

    Insulation From My Ceiling Light

    Can I Remove This Foil And Insulation From My Ceiling Light R Electricians

    Attic Air Sealing Project Energy Star

    Attic Air Sealing Project Energy Star

    Recessed Lights

    Insulating And Air Sealing Existing Non Icat Recessed Lights Building America Solution Center

    Insulated Can Lights In Ceilings

    How To Use Insulated Can Lights In Ceilings Diy


    Leave a Reply

    Your email address will not be published. Required fields are marked *

    This site uses Akismet to reduce spam. Learn how your comment data is processed.