Light Fixture To Ceiling Fan Wiring - A Comprehensive Guide
Upgrading your home with a ceiling fan can elevate both style and comfort. However, the electrical aspect of the installation can be daunting, especially if you have little experience. This comprehensive guide will walk you through the essential steps of wiring a light fixture to a ceiling fan, empowering you to tackle this project safely and efficiently.
Safety First: Essential Precautions
Before embarking on any electrical work, prioritizing safety is paramount. Follow these precautions:
- Turn off the power at the circuit breaker panel to prevent electrical shocks.
- Wear insulated gloves for added protection.
- Use a voltage tester to ensure the power is completely disconnected.
Identifying the Wires
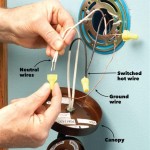
Typically, ceiling fans and light fixtures come with color-coded wires. Understanding their purpose is crucial for proper wiring:
- White: Neutral wire (connects to white wires)
- Black: Hot wire (connects to black wires)
- Green or bare copper: Ground wire (connects to green or bare copper wires)
Wiring the Fixture to the Fan Motor
Begin by connecting the wires from the light fixture to the corresponding wires on the fan motor:
- Connect the white wire from the fixture to the white wire on the motor (neutral).
- Connect the black wire from the fixture to the black wire on the motor (hot).
- Connect the green or bare copper wire from the fixture to the green or bare copper wire on the motor (ground).
Wiring the Fan to the Ceiling Box
Next, connect the fan wires to the wires in the ceiling box:
- Connect the white wire from the fan to the white wire in the ceiling box (neutral).
- Connect the black wire from the fan to the black wire in the ceiling box (hot).
- Connect the green or bare copper wire from the fan to the green or bare copper wire in the ceiling box (ground).
Installing the Bracket and Fan
Once all the wires are connected, secure the mounting bracket to the ceiling box and attach the fan to the bracket.
Balancing the Blades
For optimal performance, the fan blades need to be balanced. Use a blade balancing kit to identify any imbalances and make necessary adjustments.
Testing the Fan and Light
Turn on the power at the circuit breaker panel and test the fan and light. Ensure they operate smoothly and without any flickering or humming noises.
Additional Considerations
- If you encounter any difficulties during the wiring process, do not hesitate to consult a qualified electrician.
- Use wire nuts or electrical tape to secure all connections and insulate exposed wires.
- Cover the ceiling box with an electrical outlet cover for a clean and finished look.

Replacing A Ceiling Fan Light With Regular Fixture Jlc
Replacing A Ceiling Fan Light With Regular Fixture Jlc

Replace Light Fixture W Ceiling Fan R Askanelectrician

How To Replace A Ceiling Fan With Pendant Light
Ceiling Fan Light Fixture Replacement Ifixit Repair Guide

Ceiling Fan Wiring Diagram Power Into Light Dual Switch

Trouble Replacing Ceiling Fan With Light Fixture R Electrical

Wiring A Ceiling Fan Light Part 2

How To Replace A Light Fixture With Ceiling Fan Projects By Peter

How To Replace A Light Fixture With Ceiling Fan Projects By Peter
Related Posts


