How to replace ceiling electrical box for fan or light install a an old work retrofit junction support heavy fixture change the home depot diy family handyman pendant

How To Replace Ceiling Electrical Box For Fan Or Light

How To Replace Ceiling Electrical Box For Fan Or Light
:strip_icc()/102160203-3147dc9a4cb14fdf8aca26c67b27be45.jpg?strip=all "How To Install A Ceiling Fan Electrical Box")
How To Install A Ceiling Fan Electrical Box

How To Install An Old Work Ceiling Box

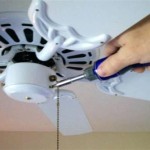
Install A Ceiling Fan Retrofit Junction Box Support Heavy Light Fixture

How To Install Electrical Box For Ceiling Light Fixture

How To Change A Light Fixture

How To Install A Light Fixture The Home Depot

How To Install A Ceiling Light Fixture Diy Family Handyman

How To Install A Ceiling Light Fixture Diy Family Handyman
/installing-a-pendant-light-2175009-Hero-01-67e2c0e1580f45b39d30a6b9497140a9.jpg?strip=all "How To Install A Pendant Light")
How To Install A Pendant Light

How To Install A Ceiling Fan The Home Depot

How To Change A Ceiling Light Making Maanita

How To Change A Light Fixture House Of Hipsters

Is It Hard To Change A Light Fixture Promaster Home Repair Handyman

A Step By Guide To Replace The Ceiling Electrical Box

How To Install A Ceiling Light Fixture Diy Family Handyman

How To Replace Install A Light Fixture The Art Of Manliness
:strip_icc()/SCW_128_06-ea78cc2964b7460896c5ed7f8f20aae4.jpg?strip=all "How To Install A Ceiling Fan Electrical Box")
How To Install A Ceiling Fan Electrical Box
How to replace ceiling electrical box install a fan an old work retrofit junction light fixture change the pendant