Essential Considerations for Replacing Light Switch with Ceiling Fan
Upgrading a light switch with a ceiling fan can enhance the functionality and aesthetics of a room. However, it requires careful planning and execution to ensure safety and optimal performance. This article explores the essential aspects to consider when undertaking this task, guiding homeowners through the key factors to successful installation.
Before proceeding, it is important to recognize that "replace light switch with ceiling fan" is a verb phrase. This action-oriented phrase indicates the process of removing the existing light switch and installing a ceiling fan in its place. Understanding this part of speech helps us focus on the necessary steps and considerations involved in carrying out this task.
Safety Precautions
Safety should be paramount when working with electrical components. Ensure the power is turned off at the circuit breaker or fuse box before commencing any work. Use insulated tools and observe proper electrical safety protocols to prevent injury.
Wiring Compatibility
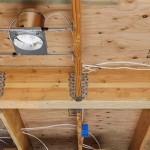
Ceiling fans require different electrical wiring than standard light switches. Verify that the wiring in the ceiling junction box is compatible with the fan's electrical requirements. If not, engage the services of a qualified electrician to ensure safe and proper installation.
Mounting Support
Ceiling fans can be quite heavy. Confirm that the ceiling structure can adequately support the fan's weight. Use a ceiling fan-rated electrical box and mounting bracket to ensure secure and stable installation.
Height and Clearance
Determine the optimal height and clearance for the ceiling fan. Consider the room's dimensions, furniture layout, and any potential obstacles that could interfere with the fan's operation or safety.
Fan Selection
Choose a ceiling fan that suits the size and style of the room. Consider factors such as blade span, airflow capacity, and fan control options to find the best fit for your needs.
Installation Procedure
Follow the manufacturer's instructions carefully during installation. Start by connecting the electrical wires and mounting the fan securely to the ceiling. Ensure all screws and bolts are properly tightened for stability.
Testing and Adjustments
Once the ceiling fan is installed, turn the power back on and test its operation. Make any necessary adjustments to ensure smooth and balanced rotation. Position the fan blades for optimal airflow and comfort.
Conclusion
Replacing a light switch with a ceiling fan can improve both the functionality and comfort of a room. By understanding the essential aspects outlined in this article, homeowners can approach this task with confidence. Careful consideration of safety, wiring compatibility, mounting support, height and clearance, fan selection, installation procedure, and testing will lead to a successful and enjoyable ceiling fan installation.

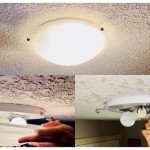
Replacing A Ceiling Fan Light With Regular Fixture Jlc

Replace Light Fixture W Ceiling Fan R Askanelectrician

Replacing A Ceiling Fan Light With Regular Fixture Jlc

Wiring A Ceiling Fan And Light With Diagrams Ptr

Wiring A Ceiling Fan And Light With Diagrams Ptr

Ceiling Fan Switch 3 Sd 4 Wire Zing Ear Ze 268s6 Pull Chain Control Replacement Fans Wall Lamps Cabinet Light Com

How To Wire A Ceiling Fan Control Using Dimmer Switch

How To Wire A Ceiling Fan For Separate Control Fo The And Light

Wiring A Ceiling Fan And Light With Diagrams Ptr

How To Fix Replace A Ceiling Fan Pull Chain Switch
Related Posts