Replace Recessed Light Ceiling Fan
A ceiling fan is a great way to circulate air in a room and provide a cooling breeze. If you're replacing a recessed light with a ceiling fan, there are a few things you'll need to do to prepare. Here's a step-by-step guide:
1. Turn off the power
Before you start any work, make sure to turn off the power to the circuit that feeds the recessed light. You can do this by flipping the breaker or removing the fuse.
2. Remove the existing recessed light
Once the power is off, you can remove the existing recessed light. Most recessed lights are held in place by a few screws. Remove the screws and carefully pull the light out of the ceiling.
3. Measure the ceiling joists
Before you install the ceiling fan, you need to measure the distance between the ceiling joists. This will tell you how far apart to mount the fan's mounting bracket. The ceiling joists are usually 16 inches or 24 inches apart. Measure the distance between the joists and mark the location of the mounting bracket on the ceiling.
4. Install the mounting bracket
The mounting bracket is what will hold the ceiling fan in place. Place the mounting bracket on the ceiling and align the holes with the marks you made in the previous step. Use screws to secure the mounting bracket to the ceiling joists.
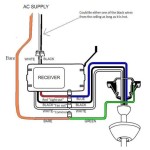
5. Connect the wires
Once the mounting bracket is installed, you need to connect the wires. The wires from the ceiling fan will need to be connected to the wires from the electrical box. Make sure to connect the black wires together, the white wires together, and the green wires together. Use wire nuts to secure the connections.
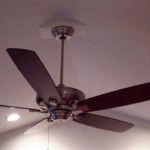
6. Install the ceiling fan
Once the wires are connected, you can install the ceiling fan. Lift the ceiling fan into place and align the holes on the fan with the holes on the mounting bracket. Secure the ceiling fan to the mounting bracket with screws.
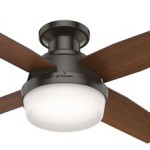
7. Install the light kit
If your ceiling fan came with a light kit, you'll need to install it now. The light kit will usually consist of a canopy, a light bulb socket, and a glass shade. Attach the canopy to the ceiling fan and then screw in the light bulb.
8. Turn on the power
Once the ceiling fan is installed, you can turn on the power. Test the fan to make sure it's working properly. If the fan is not working, check the connections to make sure they are secure.
9. Enjoy your new ceiling fan
Your new ceiling fan will provide you with years of comfort and enjoyment. You can now enjoy a cooling breeze in your room and save money on your energy bills.

How To Replace A Recessed Light With Ceiling Fan Quora

6 In Recessed Light Conversion Kit White Can Converter R56

Avoid Strobing Try These Recessed Lights Layouts With Ceiling Fan

Can Light Conversion Kit For Thecanconverter

How To Layout Recessed Lights With A Ceiling Fan Lamphq

Recessed Lighting Solutions For Living Rooms Entryways And Dining Ideas Advice Lamps Plus

How To Replace Recessed Lighting With Led The Home Depot

4 Ways To Replace A Light Bulb In Ceiling Fan Wikihow

8 Recessed Lighting Installation Tips For Diyers Bob Vila

Replace Recessed Light With A Pendant Fixture
Related Posts