Replacing a Ceiling Fan Wall Control
Replacing a ceiling fan wall control can enhance functionality and aesthetics. This article provides a comprehensive guide to replacing existing wall controls, covering various aspects of the process, from selecting the right replacement to safely completing the installation.
Key Considerations Before Starting
Several factors influence the selection and installation process. Understanding these elements ensures a smooth and successful replacement.
- Compatibility: Ensure the new control is compatible with the existing fan motor and wiring. Check voltage and amperage ratings.
- Fan Type: Different fan types (e.g., standard, multi-speed, with light) require specific control types.
- Wiring Configuration: Identify the existing wiring configuration to ensure correct connections with the new control.
- Features: Consider desired features such as dimming capabilities, remote control functionality, and smart home integration.
Gathering Necessary Tools and Materials
Proper preparation streamlines the replacement process. Having the necessary tools readily available prevents unnecessary delays.
- Screwdrivers: Flathead and Phillips head screwdrivers are essential for removing and installing screws.
- Wire Strippers/Cutters: These tools are needed for preparing wires for connection.
- Voltage Tester: A voltage tester confirms power is off before working with wiring.
- Electrical Tape: Electrical tape secures wire connections and insulates exposed wire.
- Wire Connectors (Wire Nuts): These secure wire connections and ensure proper electrical contact.
Safety Precautions
Working with electricity requires careful attention to safety. Following established safety procedures minimizes the risk of electrical shock.
- Turn Off Power: Turn off the power to the circuit at the circuit breaker box. Verify power is off using a voltage tester.
- Use Insulated Tools: Employ tools with insulated handles to prevent electrical contact.
- Avoid Contact with Exposed Wiring: Exercise caution to avoid touching any exposed wiring while power is disconnected.
Removing the Old Wall Control
Careful removal of the old control prevents damage to the wall and wiring.
- Remove the Wall Plate: Unscrew the wall plate covering the existing control.
- Disconnect Wires: Carefully disconnect the wires from the old control, noting their positions and connections.
- Remove the Control from the Wall: Unscrew the old control from the electrical box.
Installing the New Wall Control
The installation process involves connecting the new control to the existing wiring and securing it to the wall.
- Connect the Wires: Connect the wires to the new control, matching the connections from the old control. Refer to the wiring diagram provided with the new control.
- Secure the Control to the Wall: Mount the new control to the electrical box using the provided screws.
- Attach the Wall Plate: Install the new wall plate, ensuring it covers the electrical box and control completely.
Testing the New Control
Testing confirms the correct operation of the new fan control and verifies the safety of the installation.
- Restore Power: Turn the power back on at the circuit breaker box.
- Test Functionality: Test all functions of the new control, including fan speed and light operation (if applicable).
- Check for Issues: Observe for any unusual noises, vibrations, or signs of overheating.
Troubleshooting Common Issues
Occasionally, issues may arise during or after installation. Addressing these issues systematically helps resolve problems efficiently.
- Fan Not Working: Verify power is restored and check wire connections.
- Light Not Working: Check the light bulb and ensure the light wiring is connected correctly.
- Fan Speed Issues: Ensure the correct wire connections for the fan speeds. Consult the wiring diagram for the specific control.
- Humming Noise: This can indicate a loose wire connection or a problem with the fan motor.
Seeking Professional Assistance
If troubleshooting does not resolve the issue, or if there is any uncertainty about the installation process, contacting a qualified electrician is recommended.
- Safety Concerns: If there are any safety concerns regarding the electrical wiring or installation, consult a professional.
- Complex Wiring: For complex wiring configurations or unfamiliar installations, professional assistance is advisable.
- Local Codes: A qualified electrician can ensure compliance with local electrical codes and regulations.

Rewire A Switch That Controls An To Control Overhead Light Or Fan
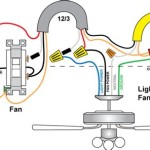
How Do I Install New Hunter Ceiling Fan With Remote Control And Still Have Switch Wall For The Light Separately R Homemaintenance

Cormier 3 Sd Ceiling Fan Wall Switch And On Off Control Ac Motor B

Minimus 38 Inch Smart Ceiling Fan With Wall Switch Smafan Com

Wiring A Ceiling Fan And Light With Diagrams Ptr

Hunter Geniune Original Ceiling Fan Replacement Wall Control 99373 Or 99375

Zing Ear Mw 201 Ceiling Fan Wall Control 3 Sd W Light Switch

Ceiling Fan Control Dimmer Light Switch 2 In 1 And Combination Wall Single Pole Neutral Wire Needed Com

Ceiling Fan Wall Controller With 3 Sds And Light Switch The Lighting

Universal Ceiling Fan And Light Remote Control Kit Add A No In Wall Wiring Required Switch Sd Timming On Off Scene With Receiver Plate
Related Posts