Revit Pendant Light On Sloped Ceiling: Essential Considerations
Incorporating pendant lights into a space with a sloped ceiling can add a touch of elegance and functionality. However, achieving a seamless and aesthetically pleasing installation requires careful planning and attention to detail. This article will explore essential aspects to consider when installing a Revit pendant light on a sloped ceiling, ensuring a successful outcome.
1. Pendant Light Selection
Choosing an appropriate pendant light is crucial. Consider the overall style of the space, the desired ambiance, and the height of the sloped ceiling. Pendant lights with adjustable stems or chains allow for customizable heights, accommodating sloped ceilings. Additionally, selecting a light that complements the architectural features and existing decor enhances the overall design.
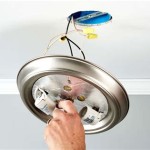
2. Sloped Ceiling Junction Box Installation
Proper junction box installation is essential for a secure and functional pendant light setup. Determine the desired mounting location and ensure the junction box is compatible with the light's mounting bracket. Use appropriate mounting screws for the junction box and ensure it is securely attached to the ceiling joists. This step ensures the fixture's stability and safety.
3. Sloped Ceiling Canopy Selection
A canopy conceals the junction box and wiring, providing a clean and finished look. Choose a canopy that matches the style of the pendant light and the ceiling's slope. Canopy adapters are available to accommodate different ceiling angles, ensuring a proper fit and preventing light leakage.
4. Electrical Wiring
Ensure the electrical wiring is adequately rated for the pendant light's wattage and voltage. Use insulated wires and follow proper electrical codes. Connect the wires to the junction box and securely tape them together using electrical tape. Leave sufficient slack in the wires to adjust the height of the pendant light as needed.
5. Pendant Light Hanging
Once the electrical work is complete, hang the pendant light. Attach the mounting bracket to the canopy and connect it to the junction box. Use the adjustable stem or chain to achieve the desired height and align the pendant light with the ceiling's slope. Tighten all connections securely to ensure stability and prevent the light from swaying.
6. Troubleshooting and Maintenance
Proper maintenance and troubleshooting ensure the pendant light's longevity and safety. If you encounter any flickering or dimming, check the electrical connections and ensure the bulb is securely installed. Clean the light fixture regularly to maintain its appearance and prevent dust buildup, which can affect its performance.
Conclusion
By following these essential considerations, you can successfully install a Revit pendant light on a sloped ceiling, enhancing the aesthetics and functionality of your space. Remember, proper planning, careful execution, and attention to detail are key to achieving a seamless and illuminating addition to your home or commercial setting.

Pendant Light On Sloped Ceiling Autodesk Community Revit S

Pendant Lights On Slanted Ceiling Autodesk Community Revit S

Pendant Light Vertical On Sloped Ceiling Autodesk Community Revit S

Enjoy Revit Gravity In

Pendant Light Vertical On Sloped Ceiling Autodesk Community Revit S

Solved Revit Family Light On Sloped Ceiling Autodesk Community S

Add On Hardware For Sloped Ceiling

Solved Pendant Lights Hanging From A Sloped Ceiling Autodesk Community Revit S

Revit Ceiling Pendant Lighting Families Modern Collection 3d Model Cgtrader

Enjoy Revit Gravity In
Related Posts