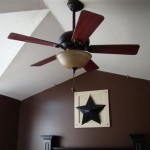
Westinghouse Ceiling Fan Light Cover Replacement: An Essential Guide
Replacing the light cover on your Westinghouse ceiling fan is a simple task that can be completed in just a few minutes. By following these step-by-step instructions, you can ensure that your fan is operating safely and efficiently.
Tools Required:
- Screwdriver (Phillips or flathead, depending on your fan model)
- New light cover
Safety Precautions:
- Turn off the power to the ceiling fan at the circuit breaker or fuse box.
- Allow the fan to cool completely before beginning any work.
Step-by-Step Instructions:
- Locate the Screws: Find the screws that secure the light cover to the fan body. They will typically be located on the underside of the light cover.
- Remove the Screws: Use the appropriate screwdriver to remove the screws that secure the light cover. Be careful not to lose the screws.
- Remove the Light Cover: Gently pull the light cover straight down to detach it from the fan body.
- Install the New Light Cover: Align the new light cover with the fan body and carefully push it up into place. Ensure that it is firmly seated.
- Secure the Screws: Insert the screws into the designated holes on the light cover and tighten them securely. Do not overtighten, as this can damage the light cover.
- Restore Power: Turn on the power to the ceiling fan at the circuit breaker or fuse box.
- Test the Fan: Operate the ceiling fan to ensure that the light cover is securely attached and that the fan is operating properly.
Additional Tips:
- If you are having difficulty removing the old light cover, try using a putty knife or other pry tool to gently loosen it.
- Be sure to replace the light cover with a compatible model that is designed specifically for your Westinghouse ceiling fan.
- If you have any questions or concerns, consult the user manual for your specific fan model or contact Westinghouse customer service for assistance.
Conclusion:
Replacing the light cover on a Westinghouse ceiling fan is a quick and easy task that can enhance the appearance and functionality of your fan. By following these simple instructions and taking the necessary safety precautions, you can ensure that your fan operates safely and efficiently for years to come.

Westinghouse 724756910 Light Fixture Shade Lightbulbs Com

Westinghouse 7889100 Light Fixture Shade Lightbulbs Com

Westinghouse 781086910 Light Fixture Shade Lightbulbs Com

Light Cover For Westinghouse Ceiling Fan Tv Home Appliances Other On Carou

Westinghouse 724716910 Lightbulbs Com

Westinghouse 724756910 Light Fixture Shade Lightbulbs Com

Spare Parts For Westinghouse Ceiling Fan 78017 Comet White Home Commercial Heaters Ventilation Fans

4 Ways To Replace A Light Bulb In Ceiling Fan Wikihow

Westinghouse Comet 52 In Integrated Led Brushed Pewter Ceiling Fan With Light Kit 7234100 The Home Depot

Westinghouse Comet 52 In Integrated Led Brushed Pewter Ceiling Fan With Light Kit 7234100 The Home Depot
Related Posts